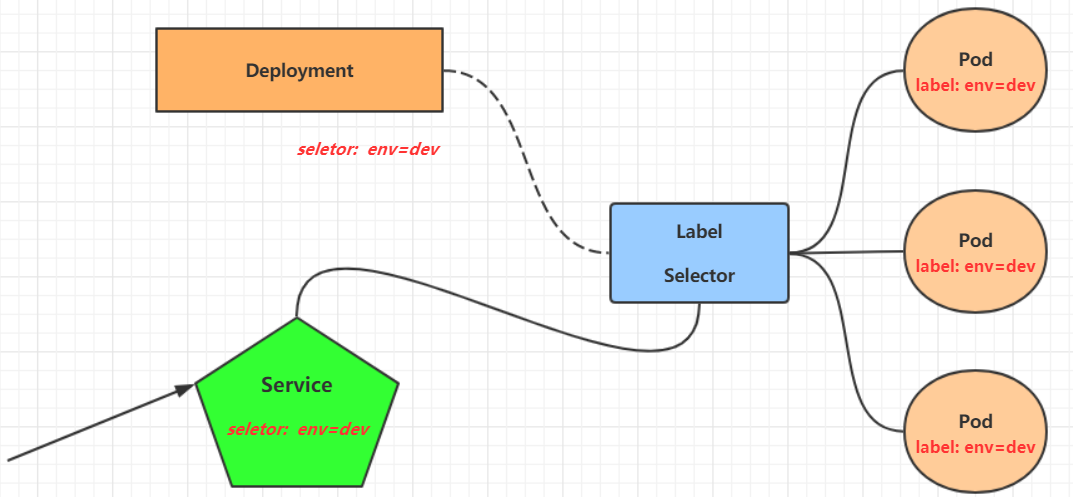
Service概述 在kubernetes中,pod是应用程序的载体,可以通过pod的ip来访问应用程序,但是pod的ip地址不是固定的,这也就意味着不方便直接采用pod的ip对服务进行访问。为了解决这个问题,kubernetes提供了Service资源,Service会对提供同一个服务的多个pod进行聚合,并且提供一个统一的入口地址。通过访问Service的入口地址就能访问到后面的pod服务。
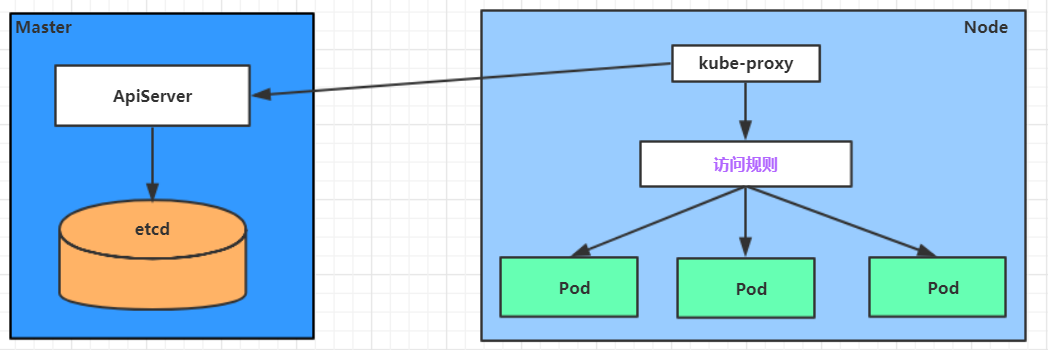
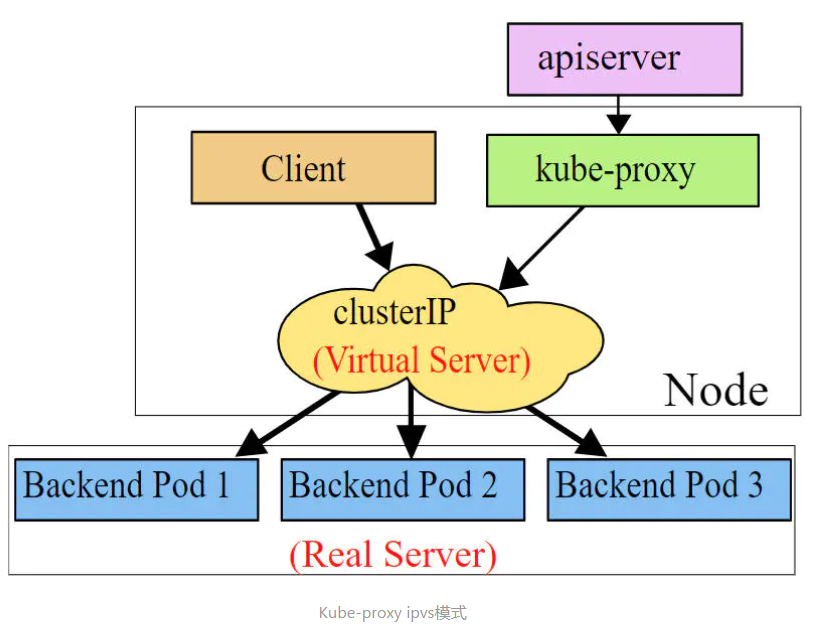
Service在很多情况下只是一个概念,真正起作用的其实是kube-proxy服务进程,每个Node节点上都运行着一个kube-proxy服务进程。当创建Service的时候会通过api-server向etcd写入创建的service的信息,而kube-proxy会基于监听的机制发现这种Service的变动,然后它会将最新的Service信息转换成对应的访问规则 。
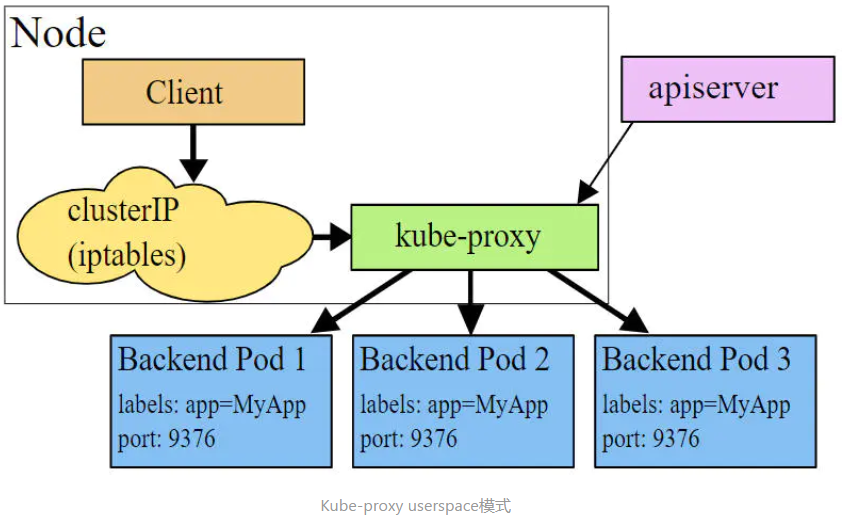
工作模式 userspace 模式 userspace模式下,kube-proxy会为每一个Service创建一个监听端口,发向Cluster IP的请求被Iptables规则重定向到kube-proxy监听的端口上,kube-proxy根据LB算法选择一个提供服务的Pod并和其建立链接,以将请求转发到Pod上。该模式下,kube-proxy充当了一个四层负责均衡器的角色。由于kube-proxy运行在userspace中,在进行转发处理时会增加内核和用户空间之间的数据拷贝,虽然比较稳定,但是效率比较低。
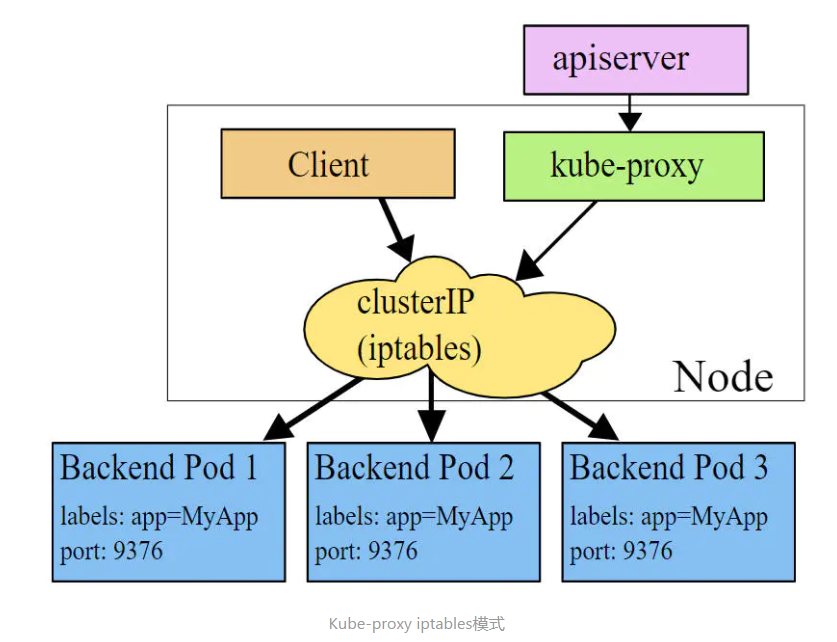
iptables模式 iptables模式下,kube-proxy为service后端的每个Pod创建对应的iptables规则,直接将发向Cluster IP的请求重定向到一个Pod IP。该模式下kube-proxy不承担四层负责均衡器的角色,只负责创建iptables规则。该模式的优点是较userspace模式效率更高,但不能提供灵活的LB策略,当后端Pod不可用时也无法进行重试。
ipvs模式 ipvs模式和iptables类似,kube-proxy监控Pod的变化并创建相应的ipvs规则。ipvs相对iptables转发效率更高。除此以外,ipvs支持更多的LB算法。
设置工作模式 1 2 3 4 5 6 7 8 9 10 11 12 13 14 15 16 17 18 19 20 21 22 23 24 25 26 27 28 29 30 31 [root@master yaml]# kubectl edit cm kube-proxy -n kube-system configmap/kube-proxy edited ...... mode: "ipvs" ...... [root@master yaml]# kubectl delete pod -l k8s-app=kube-proxy -n kube-system pod "kube-proxy-5r4xw" deleted pod "kube-proxy-qww6b" deleted pod "kube-proxy-th7hm" deleted [root@master yaml]# ipvsadm -Ln IP Virtual Server version 1.2.1 (size=4096) Prot LocalAddress:Port Scheduler Flags -> RemoteAddress:Port Forward Weight ActiveConn InActConn TCP 10.96.0.1:443 rr -> 192.16.1.10:6443 Masq 1 0 0 TCP 10.96.0.10:53 rr -> 10.244.52.213:53 Masq 1 0 0 -> 10.244.52.218:53 Masq 1 0 0 TCP 10.96.0.10:9153 rr -> 10.244.52.213:9153 Masq 1 0 0 -> 10.244.52.218:9153 Masq 1 0 0 UDP 10.96.0.10:53 rr -> 10.244.52.213:53 Masq 1 0 0 -> 10.244.52.218:53 Masq 1 0 0
Service资源清单 1 2 3 4 5 6 7 8 9 10 11 12 13 14 15 kind: Service apiVersion: v1 metadata: name: service namespace: <命名空间> spec: selector: type: <Service类型> clusterIP: <虚拟服务的ip地址> sessionAffinity: ports: - protocol: <协议> port: <service端口> targetPort: <pod端口> nodePort: <主机端口>
Service类型如下:
ClusterIP:默认值,它是Kubernetes系统自动分配的虚拟IP,只能在集群内部访问
NodePort:将Service通过指定的Node上的端口暴露给外部,通过此方法,就可以在集群外部访问服务
LoadBalancer:使用外接负载均衡器完成到服务的负载分发,注意此模式需要外部云环境支持
ExternalName: 把集群外部的服务引入集群内部,直接使用
Service使用 实验环境 在使用service之前,首先利用Deployment创建出3个pod,注意要为pod设置app=nginx-pod的标签。
创建Service-Env.yaml,内容如下
1 2 3 4 5 6 7 8 9 10 11 12 13 14 15 16 17 18 19 20 apiVersion: apps/v1 kind: Deployment metadata: name: service-env namespace: default spec: replicas: 3 selector: matchLabels: app: service-env template: metadata: labels: app: service-env spec: containers: - name: nginx image: docker.io/library/nginx:1.23.1 ports: - containerPort: 80
1 2 3 4 5 6 7 8 9 10 11 12 13 14 15 16 17 18 19 20 21 22 23 24 25 26 27 28 29 30 31 32 33 34 [root@master yaml]# kubectl create -f Service-Env.yaml deployment.apps/service-env created [root@master yaml]# kubectl get pods -n default -o wide --show-labels NAME READY STATUS RESTARTS AGE IP NODE NOMINATED NODE READINESS GATES LABELS service-env-77bd9f74d4-7qntr 1/1 Running 0 108s 10.244.52.222 work2.host.com <none> <none> service-env-77bd9f74d4-9hs5k 1/1 Running 0 108s 10.244.67.84 work1.host.com <none> <none> service-env-77bd9f74d4-s5hh5 1/1 Running 0 108s 10.244.67.79 work1.host.com <none> <none> [root@master yaml]# kubectl exec -it service-env-77bd9f74d4-7qntr -n default /bin/sh kubectl exec [POD] [COMMAND] is DEPRECATED and will be removed in a future version. Use kubectl exec [POD] -- [COMMAND] instead. [root@master yaml]# kubectl exec -it service-env-77bd9f74d4-9hs5k -n default /bin/sh kubectl exec [POD] [COMMAND] is DEPRECATED and will be removed in a future version. Use kubectl exec [POD] -- [COMMAND] instead. [root@master yaml]# kubectl exec -it service-env-77bd9f74d4-s5hh5 -n default /bin/sh kubectl exec [POD] [COMMAND] is DEPRECATED and will be removed in a future version. Use kubectl exec [POD] -- [COMMAND] instead. [root@master yaml]# curl 10.244.52.222 10.244.52.222 [root@master yaml]# curl 10.244.67.84 10.244.67.84 [root@master yaml]# curl 10.244.67.79 10.244.67.79
ClusterIP 创建Service-Clusterip.yaml,内容如下
1 2 3 4 5 6 7 8 9 10 11 12 13 apiVersion: v1 kind: Service metadata: name: service-clusterip namespace: default spec: selector: app: service-env clusterIP: 10.97 .1 .1 type: ClusterIP ports: - port: 80 targetPort: 80
1 2 3 4 5 6 7 8 9 10 11 12 13 14 15 16 17 18 19 20 21 22 23 24 25 26 27 28 29 30 31 32 33 34 35 36 37 38 39 40 41 42 43 44 45 [root@master yaml ] service/service-clusterip created [root@master yaml ] NAME TYPE CLUSTER-IP EXTERNAL-IP PORT(S) AGE SELECTOR kubernetes ClusterIP 10.96 .0 .1 <none> 443 /TCP 2d18h <none> service-clusterip ClusterIP 10.97 .1 .1 <none> 80 /TCP 4m42s app=service-env [root@master yaml ] Name: service-clusterip Namespace: default Labels: <none> Annotations: <none> Selector: app=service-env Type: ClusterIP IP Family Policy: SingleStack IP Families: IPv4 IP: 10.97 .1 .1 IPs: 10.97 .1 .1 Port: <unset> 80 /TCP TargetPort: 80 /TCP Endpoints: 10.244 .52 .222 :80,10.244.67.79:80,10.244.67.84:80 Session Affinity: None Events: <none> [root@master yaml ] ...... TCP 10.97 .1 .1 :80 rr -> 10.244 .52 .222 :80 Masq 1 0 0 -> 10.244 .67 .79 :80 Masq 1 0 0 -> 10.244 .67 .84 :80 Masq 1 0 0 ...... [root@master yaml ] 10.244 .67 .84 [root@master yaml ] 10.244 .67 .79 [root@master yaml ] 10.244 .52 .222
HeadLiness Endpoint是kubernetes中的一个资源对象,存储在etcd中,用来记录一个service对应的所有pod的访问地址,它是根据service配置文件中selector描述产生的。一个Service由一组Pod组成,这些Pod通过Endpoints暴露出来,Endpoints是实现实际服务的端点集合 。换句话说,service和pod之间的联系是通过endpoints实现的。
创建Service-Headliness.yaml,内容如下
1 2 3 4 5 6 7 8 9 10 11 12 13 apiVersion: v1 kind: Service metadata: name: service-headliness namespace: default spec: selector: app: service-env clusterIP: None type: ClusterIP ports: - port: 80 targetPort: 80
1 2 3 4 5 6 7 8 9 10 11 12 13 14 15 16 17 18 19 20 21 22 23 24 25 26 27 28 29 30 31 32 33 34 35 36 37 38 39 40 41 42 43 [root@master yaml ] service/service-headliness created [root@master yaml ] NAME TYPE CLUSTER-IP EXTERNAL-IP PORT(S) AGE SELECTOR service-headliness ClusterIP None <none> 80 /TCP 43s app=service-env [root@master yaml ] Name: service-headliness Namespace: default Labels: <none> Annotations: <none> Selector: app=service-env Type: ClusterIP IP Family Policy: SingleStack IP Families: IPv4 IP: None IPs: None Port: <unset> 80 /TCP TargetPort: 80 /TCP Endpoints: 10.244 .52 .222 :80,10.244.67.79:80,10.244.67.84:80 Session Affinity: None Events: <none> [root@master yaml ] kubectl exec [POD ] [COMMAND ] is DEPRECATED and will be removed in a future version. Use kubectl exec [POD ] -- [COMMAND ] instead. search default.svc.cluster.local svc.cluster.local cluster.local host.com nameserver 10.96 .0 .10 options ndots:5 [root@master yaml ] 10.244 .67 .84 10.244 .52 .222 10.244 .67 .79
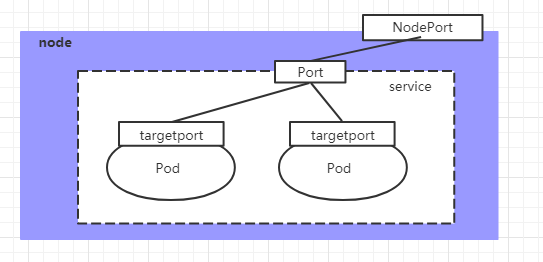
NodePort 如果希望将Service暴露给集群外部使用,那么就要使用到另外一种类型的Service,称为NodePort类型。NodePort的工作原理其实就是将service的端口映射到Node的一个端口上 ,然后就可以通过NodeIp:NodePort来访问service了。
创建Service-Nodeport.yaml,内容如下
1
2
3
4
5
6
7
8
9
10
11
12
13
apiVersion: v1 kind: Service metadata: name: service-nodeport namespace: default spec: selector: app: service-env type: NodePort ports: - port: 80 nodePort: 30002 targetPort: 80
1 2 3 4 5 6 7 8 9 10 11 12 13 14 15 16 17 [root@master yaml]# kubectl create -f Service-Nodeport.yaml service/service-nodeport created [root@master yaml]# kubectl get svc -n default -o wide NAME TYPE CLUSTER-IP EXTERNAL-IP PORT(S) AGE SELECTOR service-nodeport NodePort 10.101.89.79 <none> 80:30002/TCP 20s app=service-env [root@master yaml]# curl http://master.host.com:30002 10.244.67.84 [root@master yaml]# curl http://work1.host.com:30002 10.244.67.79 [root@master yaml]# curl http://work2.host.com:30002 10.244.67.84
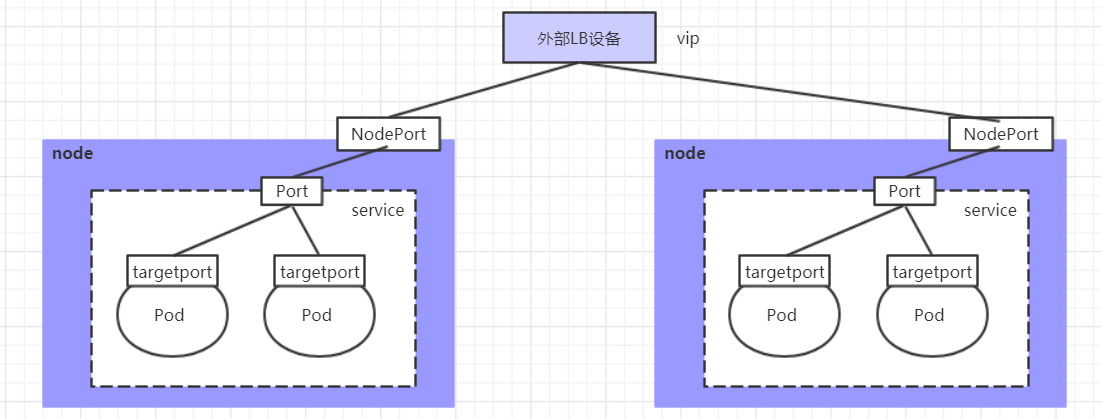
LoadBalancer LoadBalancer和NodePort很相似,目的都是向外部暴露一个端口,区别在于LoadBalancer会在集群的外部再来做一个负载均衡设备,而这个设备需要外部环境支持的,外部服务发送到这个设备上的请求,会被设备负载之后转发到集群中。实现LoadBalancer需要外部设备,这里不做演示。
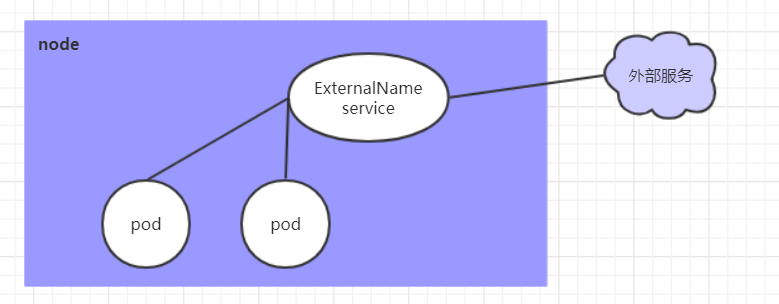
ExternalName ExternalName类型的Service用于引入集群外部的服务,它通过externalName属性指定外部一个服务的地址,然后在集群内部访问此service就可以访问到外部的服务了。
创建Service-Externalname.yaml,内容如下
1
2
3
4
5
6
7
8
apiVersion: v1 kind: Service metadata: name: service-externalname namespace: default spec: type: ExternalName externalName: www.baidu.com
1 2 3 4 5 6 7 8 9 [root@master yaml]# kubectl create -f Service-Externalname.yaml service/service-externalname created [root@master yaml]# dig @10.96.0.10 service-externalname.default.svc.cluster.local +short www.baidu.com. 39.156.66.14 39.156.66.18
注意 service域名解析记录的域名组成如下
1 [资源名称].[命名空间].svc.cluster.local