概述 淘宝开发的ngx_lua模块通过将lua解释器解释器集成Nginx,可以采用lua脚本实现业务逻辑,由于lua的紧凑、快速以及内建协程,所以在保证高并发服务能力的同时极大降低了业务逻辑实现成本。
安装方式1(已弃用) lua-nginx-module LuaJIT是采用C语言编写的Lua代表的解释器。http://luajit.org https://github.com/LuaJIT/LuaJIT/tags
1
2
3
4
5
6
7
8
9
10
11
12
13
14
15
16
17
18
19
20
21
22
23
24
[root@work env ]# wget https://github.com/LuaJIT/LuaJIT/archive/refs/tags/v2.0.5.tar.gz [root@work env ]# tar xvf v2.0.5.tar.gz [root@work env ]# cd LuaJIT-2.0.5/ [root@work LuaJIT-2.0.5]# make && make install make[1]: Leaving directory '/opt/env/LuaJIT-2.0.5/src' ==== Successfully built LuaJIT 2.0.5 ==== ==== Installing LuaJIT 2.0.5 to /usr/local ==== mkdir -p /usr/local/bin /usr/local/lib /usr/local/include/luajit-2.0 /usr/local/share/man/man1 /usr/local/lib/pkgconfig /usr/local/share/luajit-2.0.5/jit /usr/local/share/lua/5.1 /usr/local/lib/lua/5.1cd src && install -m 0755 luajit /usr/local/bin/luajit-2.0.5cd src && test -f libluajit.a && install -m 0644 libluajit.a /usr/local/lib/libluajit-5.1.a || :rm -f /usr/local/bin/luajit /usr/local/lib/libluajit-5.1.so.2.0.5 /usr/local/lib/libluajit-5.1.so /usr/local/lib/libluajit-5.1.so.2cd src && test -f libluajit.so && \ install -m 0755 libluajit.so /usr/local/lib/libluajit-5.1.so.2.0.5 && \ ldconfig -n /usr/local/lib && \ ln -sf libluajit-5.1.so.2.0.5 /usr/local/lib/libluajit-5.1.so && \ ln -sf libluajit-5.1.so.2.0.5 /usr/local/lib/libluajit-5.1.so.2 || : cd etc && install -m 0644 luajit.1 /usr/local/share/man/man1cd etc && sed -e "s|^prefix=.*|prefix=/usr/local|" -e "s|^multilib=.*|multilib=lib|" luajit.pc > luajit.pc.tmp && \ install -m 0644 luajit.pc.tmp /usr/local/lib/pkgconfig/luajit.pc && \ rm -f luajit.pc.tmp cd src && install -m 0644 lua.h lualib.h lauxlib.h luaconf.h lua.hpp luajit.h /usr/local/include/luajit-2.0cd src/jit && install -m 0644 bc.lua v.lua dump.lua dis_x86.lua dis_x64.lua dis_arm.lua dis_ppc.lua dis_mips.lua dis_mipsel.lua bcsave.lua vmdef.lua /usr/local/share/luajit-2.0.5/jitln -sf luajit-2.0.5 /usr/local/bin/luajit==== Successfully installed LuaJIT 2.0.5 to /usr/local ====
lua-nginx-module nginx第三方模块lua-nginx-modulehttps://github.com/openresty/lua-nginx-module
1
2
3
[root@work env ]# wget https://github.com/openresty/lua-nginx-module/archive/refs/tags/v0.10.26.tar.gz [root@work env ]# tar xvf v0.10.26.tar.gz [root@work env ]# ln -s lua-nginx-module-0.10.26 lua-nginx-module
环境变量设置 1 2 3 4 [root@work ~]# tail -n2 /etc/profile export LUAJIT_LIB=/usr/local/libexport LUAJIT_INC=/usr/local/include/luajit-2.0[root@work ~]# source /etc/profile
扩展nginx模块 打开nginx编译安装的位置 进行重新编译安装
1
2
[root@work nginx-1.24.0]# ./configure --prefix=/usr/local/nginx --sbin-path=/usr/local/nginx/sbin/nginx --conf-path=/usr/local/nginx/conf/nginx.conf --error-log-path=/var/log/nginx/error.log --http-log-path=/var/log/nginx/access.log --pid-path=/var/run/nginx/nginx.pid --lock-path=/var/lock/nginx.lock --user=nginx --group=nginx --with-http_ssl_module --with-http_stub_status_module --with-http_gzip_static_module --http-client-body-temp-path=/var/tmp/nginx/client/ --http-proxy-temp-path=/var/tmp/nginx/proxy/ --http-fastcgi-temp-path=/var/tmp/nginx/fcgi/ --http-uwsgi-temp-path=/var/tmp/nginx/uwsgi --http-scgi-temp-path=/var/tmp/nginx/scgi --with-pcre --add-module=/opt/package/nginx/lua-nginx-module [root@work nginx-1.24.0]# make && make install
扩展的重点是--with-pcre --add-module=/opt/package/nginx/lua-nginx-module
错误 libluajit-5.1.so.2 当在扩展号nginx模块后执行nginx相关命令出现以下错误
1
2
[root@work ~]# nginx -V nginx: error while loading shared libraries: libluajit-5.1.so.2: cannot open shared object file: No such file or directory
这个错误表明 Nginx 在启动时无法找到名为 libluajit-5.1.so.2 的共享库文件。这很可能是由于 Nginx 模块依赖 LuaJIT 库,但系统中缺少了该库所致。解决办法如下
1 [root@work ~]# ln -s /usr/local/lib/libluajit-5.1.so.2 /lib64/liblua-5.1.so.2
reason: module ‘resty.core’ not found 1 2 3 4 5 6 7 8 9 10 11 12 13 14 [root@work conf]# nginx nginx: [alert] detected a LuaJIT version which is not OpenResty's; many optimizations will be disabled and performance will be compromised (see https://github.com/openresty/luajit2 for OpenResty' s LuaJIT or, even better, consider using the OpenResty releases from https://openresty.org/en/download.html) nginx: [alert] failed to load the 'resty.core' module (https://github.com/openresty/lua-resty-core); ensure you are using an OpenResty release from https://openresty.org/en/download.html (reason: module 'resty.core' not found: no field package.preload['resty.core' ] no file './resty/core.lua' no file '/usr/local/share/luajit-2.0.5/resty/core.lua' no file '/usr/local/share/lua/5.1/resty/core.lua' no file '/usr/local/share/lua/5.1/resty/core/init.lua' no file './resty/core.so' no file '/usr/local/lib/lua/5.1/resty/core.so' no file '/usr/local/lib/lua/5.1/loadall.so' no file './resty.so' no file '/usr/local/lib/lua/5.1/resty.so' no file '/usr/local/lib/lua/5.1/loadall.so' ) in /usr/local/nginx/conf/nginx.conf:117
原因似乎是缺少lua-resty-core模块,这里手动编译安装一下https://github.com/openresty/lua-resty-core
1
2
3
[root@work nginx]# tar xvf v0.1.28.tar.gz tar xvf make install
安装方式2 概述 直接使用OpenRestry,它是由淘宝工程师开发的,它是基于Nginx与Lua的高性能Web平台,其内部集成了大量精良的Lua库,第三方模块以及大多数的依赖项,用于方便搭建能够处理高并发、扩展性极高的动态Web应用、Web服务和动态网关。所以本身OpenResty内部就已经集成了Nginx和Lua,我们用起来会更加方便
安装 参考: https://openresty.org/cn/linux-packages.html
关于OpenRestry OpenRestry,它是由淘宝工程师开发的,它是基于Nginx与Lua的高性能Web平台,其内部集成了大量精良的Lua库,第三方模块以及大多数的依赖项,用于方便搭建能够处理高并发、扩展性极高的动态Web应用、Web服务和动态网关。所以本身OpenResty内部就已经集成了Nginx和Lua,我们用起来会更加方便。
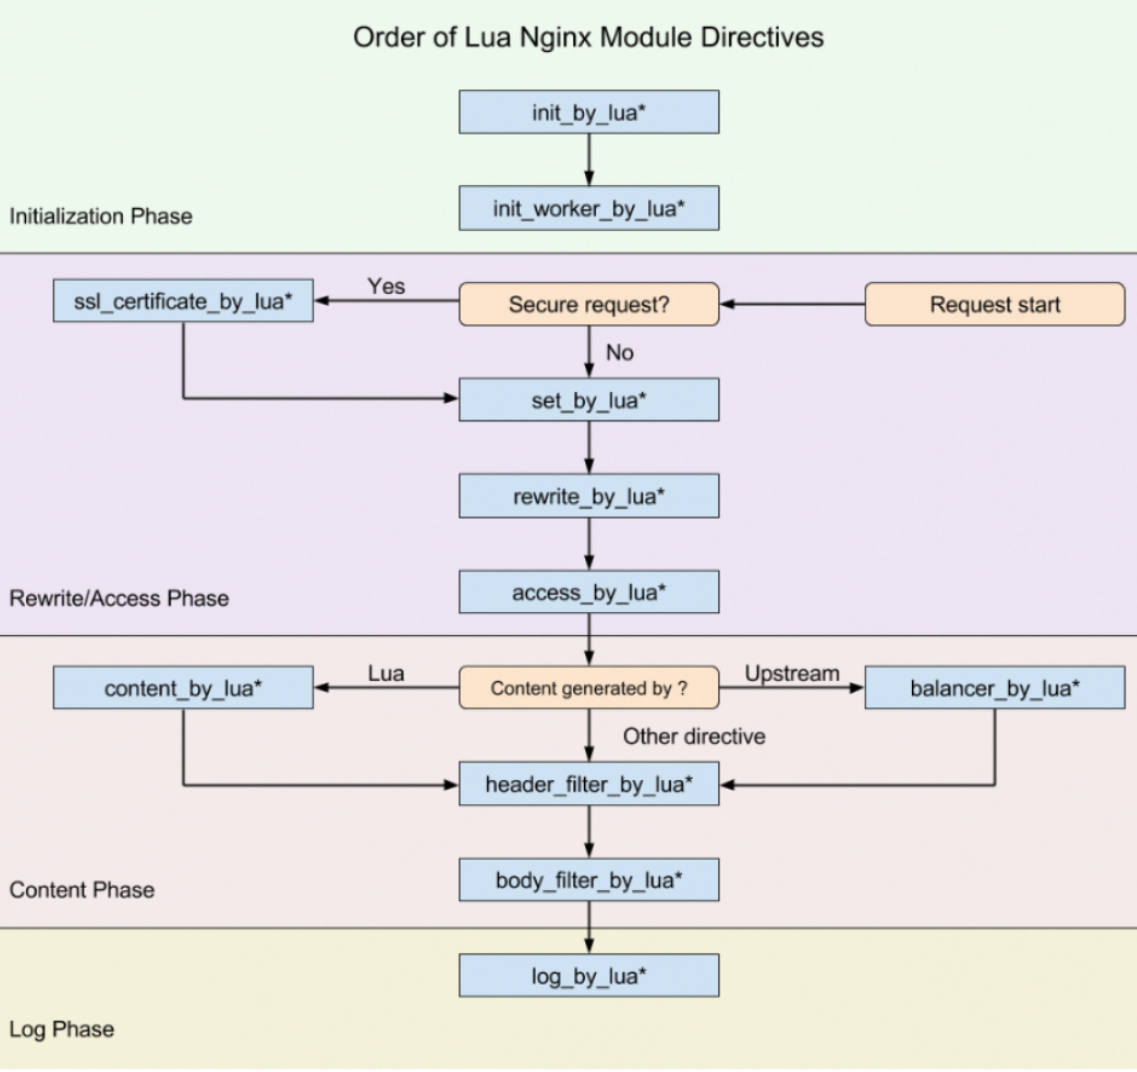
ngx_lua相关指令块 使用Lua编写Nginx脚本的基本构建块是指令。指令用于指定何时运行用户Lua代码以及如何使用结果。下图显示了执行指令的顺序。
先来解释一下*的作用
1
2
3
*:无 , 即 xxx_by_lua ,指令后面跟的是 lua指令 *:_file,即 xxx_by_lua_file 指令后面跟的是 lua文件 *:_block,即 xxx_by_lua_block 在0.9 .17 版后替换init_by_lua_file
init_by_lua* 该指令在每次Nginx重新加载配置时执行,可以用来完成一些耗时模块的加载,或者初始化一些全局配置。
init_worker_by_lua* 该指令用于启动一些定时任务,如心跳检查、定时拉取服务器配置等。
set_by_lua* 该指令只要用来做变量赋值,这个指令一次只能返回一个值,并将结果赋值给Nginx中指定的变量。
rewrite_by_lua* 该指令用于执行内部URL重写或者外部重定向,典型的如伪静态化URL重写,本阶段在rewrite处理阶段的最后默认执行。
access_by_lua* 该指令用于访问控制。例如,如果只允许内网IP访问。
content_by_lua* 该指令是应用最多的指令,大部分任务是在这个阶段完成的,其他的过程往往为这个阶段准备数据,正式处理基本都在本阶段。
该指令用于设置应答消息的头部信息。
body_filter_by_lua* 该指令是对响应数据进行过滤,如截断、替换。
log_by_lua* 该指令用于在log请求处理阶段,用Lua代码处理日志,但并不替换原有log处理。
balancer_by_lua* 该指令主要的作用是用来实现上游服务器的负载均衡器算法
ssl_certificate_by_* 该指令作用在Nginx和下游服务开始一个SSL握手操作时将允许本配置项的Lua代码。
案例1 需求 输出内容
配置 1 2 3 4 location /lua { default_type 'text/html' ; content_by_lua 'ngx.say("<h1>HELLO,OpenResty</h1>")' ; }
案例2 需求 1 2 http://xxx/?name=张三&gender=1 Nginx接收到请求后根据gender传入的值,如果是gender传入的是1,则展示张三先生,如果是0则展示张三女士,如果都不是则展示张三。
配置 1 2 3 4 5 6 7 8 9 10 11 12 13 14 15 16 17 18 19 20 21 location /getByGender { default_type 'text/html' ; set_by_lua $param " -- 获取请求URL上的参数对应的值 local uri_args = ngx.req.get_uri_args() local name = uri_args['name'] local gender = uri_args['gender'] -- 条件判断 if gender 1 先生 0 女士 if gender == '1' then return name..'先生' elseif gender == '0' then return name..'女士' else return name end " ; charset utf-8 ; return 200 $param ; }
ngx.req.get_uri_args()返回的是一个table类型
案例3 需求 配置 1 2 3 4 5 6 7 8 9 10 11 12 13 14 15 16 17 18 19 20 21 22 23 server{ listen 80 ; server_name code.boychai.xyz; client_max_body_size 4096M ; set_by_lua $param ' local name = "gitea" local port = "3000" local command = string.format("echo -n `docker inspect --format=\'{{range .NetworkSettings.Networks}}{{.IPAddress}}{{end}}\' %s`", name) local handle = io.popen(command) local result = handle:read("*a") handle:close() return "http://"..result..":"..port ' ; location / { if ( $param = 'http://:3000' ) { return 500 "Error in obtaining site IP" ; } proxy_pass $param ; proxy_set_header Host $proxy_host ; proxy_set_header X-Real-IP $remote_addr ; proxy_set_header X-Forwarded-For $proxy_add_x_forwarded_for ; } }